Frequently Asked Questions
(If you are looking for help on Timing's purchase process, please see our dedicated Pricing FAQ.)
Table of Contents
Getting Started
What does Timing do?
Timing automatically tracks which applications, documents and domains you spend time with. This way, you can quickly figure out how much time you spent on different projects and which activities (like games, Facebook, Twitter, etc.) have the worst impact on your productivity.
How does it work?
Timing can track your activities by placing a tiny utility (called the menu item) into your menu bar that automatically tracks your activities. As long as the menu item isn't running, Timing won't be able to record the time you spend using your Mac.
App Compatibility
Which applications is Timing compatible with?
Timing automatically tracks the currently viewed document of the active application. Below is a list of applications which have been confirmed to be supported by Timing. Applications listed with a have not yet been tested, but are supported with very high probability.
You may also want to check out our blog article highlighting some of the most important integrations.
In general, most document-based applications are automatically supported by Timing.
And even if Timing can't track document paths for an application, it will still track the name of the application and its window title.
Your favorite app is not listed here?
It might very well be supported anyway —
Download the free trial and check for yourself!
(And please let us know if you discover any supported apps not listed here.)
Browsers
| Application | Supported? |
|---|---|
| Safari | |
| Google Chrome | |
| Chromium | |
| Arc | |
| Mozilla Firefox | |
| Microsoft Edge | |
| Orion Browser | |
| Brave | |
| Vivaldi | |
| Opera | |
| Yandex Browser | |
| Google Search | |
| DuckDuckGo Search |
Office / Writing
| Application | Supported? |
|---|---|
| Ulysses | |
| Agenda | |
| Notion | |
| iWork | |
| Microsoft Word | |
| Microsoft Excel | |
| Microsoft Powerpoint | |
| Google Docs | |
| Google Sheets | |
| Google Slides | |
| LibreOffice | |
| OpenOffice | |
| TextMaker Office | |
| FreeOffice | |
| Scrivener | (project file path) |
| Bean | |
| Mariner Write | |
| TeXShop | |
| Caret | |
| MarsEdit | |
| iA Writer | |
| Byword | |
| Nisus Writer | |
| Mweb | |
| Adobe Acrobat | |
| PDF Expert | (window title only) |
| Affinity Publisher |
Tools
| Application | Supported? |
|---|---|
| Finder | |
| Terminal | |
| iTerm | |
| Console | |
| Sourcetree | |
| GitX | |
| Base | |
| Cyberduck | (connection name only) |
| Yummy FTP | (connection name only) |
| Ingredients | (window title only) |
| X11 | (window title only) |
| ChronoSync | |
| Remotix | (connection name only) |
Graphics & Illustration
| Application | Supported? |
|---|---|
| Sketch | |
| Adobe Photoshop | |
| Acorn | |
| Adobe Photoshop Elements | |
| Adobe InDesign | |
| Adobe Illustrator | |
| Affinity Photo | |
| Affinity Designer | |
| Adobe Lightroom | |
| Pixelmator | (image title only) |
| GIMP | (X11 application, thus window title only) |
| Inkscape | (X11 application, thus window title only) |
| Vectorworks |
IDEs
| Application | Supported? |
|---|---|
| Xcode | |
| AppCode | (Setup required) |
| Android Studio | (Setup required) |
| PhpStorm | (Setup required) |
| PyCharm | (Setup required) |
| IntelliJ IDEA | (Setup required) |
| CLion | (Setup required) |
| GoLand | (Setup required) |
| RubyMine | (Setup required) |
| WebStorm | (Setup required) |
| Eclipse | |
| Nova | |
| Coda | |
| Netbeans | (project title only) |
Editors
| Application | Supported? |
|---|---|
| Visual Studio Code | |
| Atom | |
| Sublime Text | |
| TextMate | |
| CSSEdit | |
| BBEdit | |
| TextWrangler | |
| MacVim & AquaMacs | |
| Emacs | (with customizations) |
| vim | |
| Smultron & Fraise | |
| Base | |
| TextEdit | |
| Oxygen XML |
Productivity
| Application | Supported? |
|---|---|
| Apple Notes | |
| DEVONthink | |
| Parallels | (tracks app name and window title of Windows apps in Coherence mode) |
| VMWare | (VM name only) |
| VirtualBox | (VM name and window title only) |
| TeamViewer | (session name) |
| OmniOutliner | |
| MindNode | |
| iThoughtsX | |
| OutlineEdit | |
| Obsidian | (plugin required) |
| Evernote | (window title only) |
| Scapple |
Communication
| Application | Supported? |
|---|---|
| Slack | (Slack updates might break compatibility) |
| Microsoft Teams | (team and channel name) |
| Spark | (account name when reading, email subject when writing) |
| Outlook | |
| Messages | |
| Skype | |
| (WhatsApp updates might break compatibility) | |
| Mattermost | |
| MailMate | |
| Mailplane | (account email address only) |
| PostBox | |
| Adium | (window title only) |
| Thunderbird | |
| Airmail | (subject of email being written only) |
Call Tracking
| Application | Supported? |
|---|---|
| Whereby | |
| Zoom | |
| Slack | |
| Microsoft Teams | |
| Google Meet | |
| Whereby | |
| FaceTime | |
| GoToMeeting | |
| Cisco Webex | |
| Telegram | |
| BlueJeans | |
| Discord | |
| TeamViewer | |
| RingCentral | |
Media
| Application | Supported? |
|---|---|
| YouTube Videos | |
| QuickTime Player | |
| VLC | |
| IINA | |
| iTunes | |
| MPlayerX | (video title only) |
Video Editing Tools
| Application | Supported? |
|---|---|
| Final Cut Pro | |
| Adobe Premiere Pro | |
| Adobe After Effects | |
| DaVinci Resolve | (will track time spent in the app, but no project details) |
| Blender | |
| Houdini | |
| Nuke | |
| Cinema 4D | |
| Maya | |
| frame.io |
Digital Audio Workstations
| Application | Supported? |
|---|---|
| Ableton Live | |
| Logic Pro | |
| Avid Pro Tools | |
| Avid Media Composer | |
| Adobe Audition | |
| Adobe Premiere Rush |
Reading
| Application | Supported? |
|---|---|
| Preview | |
| Skim | |
| DJView |
Your favorite app is not listed here?
It might very well be supported anyway —
Download the free trial and check for yourself!
(And please let us know if you discover any supported apps not listed here.)
Tracking & Privacy
Can Timing extract data from Parallels?
Timing can't cross the VM boundary, so it cannot track individual files edited in Parallels VMs.
If you are using "Coherence" mode, though, Timing should at least be able to track individual apps and window titles.
However, we still recommend to download the free trial and see for yourself.
If you need more detailed tracking inside Windows VMs, have a look at Timing alternatives for Windows.
How does Timing track my time? Does it track only the active app?
Once per second, Timing automatically records the window title and document path or URL (if available) of the active window, i.e. the app that you are using right now. Apps running in the background are not recorded. So when you switch apps, Timing will start tracking time for the app you switched to instead.
After a configurable delay of inactivity (i.e. no mouse and keyboard usage), Timing will automatically suspend tracking.
If you would like to "fill gaps" resulting from app switching or inactivity, have a look at creating time entries via the timeline or via the Entry-O-Matic.
Does Timing slow down my Mac or cause battery drain?
Much care has been taken to ensure that Timing's tracking will not slow down your Mac in any way. Although it tracks your activity every second, the tracker app's average CPU usage is less than 0.5%. In addition to that, the tracker app usually consumes less than 50 megabytes of system memory.
Accordingly, Timing should also have negligible impact on your Mac's battery life. You can verify that yourself by checking the "Energy" tab in your Mac's "Activity Monitor" app.
Timing's activity database has also been optimized to consume as little storage as possible, growing by just a few megabytes per month.
How about privacy? Can I disable tracking for some activities?
Timing respects your privacy and you can disable tracking at any time. See our Privacy Policy for details.
Troubleshooting & Data
It seems like Timing didn't track some activities.
Normally, Timing should be able to track activities in all apps — even if Timing doesn't support tracking document paths in a particular app, it should still track the app's name and window title.
But if some activities seem to be missing, please check the following:
- Make sure that you have selected a date range (in the picker at the top of the window) for which Timing should have tracked data. If in doubt, "Past 90 Days" is a good choice.
- Make sure that the "Timing Tracker" menu app is running and tracking has not been paused. If it isn't running, you can start it via the main app's Timing menu and let it start automatically when you log in.
- Make sure that the "Track only between" setting in Timing's menu item preferences is turned off or set to a reasonable value. Timing won't track any activity outside the hours specified there.
- Make sure that the "Disable tracking on weekends" setting in Timing's menu item preferences is turned off.
- Make sure that the activities in question are not covered by the exclusion list. If in doubt, try removing all exclusion list rules to see if that helps.
- Make sure that you have allowed Accessibility support for Timing.
- Make sure that you have allowed AppleScript tracking for Timing.
- Make sure that the activity is not filtered out by your project selection in the sidebar.
- Make sure that the activity is not filtered out by your filter selection in the toolbar.
- Try restarting the Timing tracker app. You can quit it by clicking the menu item itself, then restart it from the 'Timing' menu of the main app.
- Timing has a setting where it can let days start at a specific time of day. If you set that time to be very late (e.g. 11pm), Timing will show any time before that as belonging to the previous day. Could that also explain what you are seeing? (You can change that setting in Timing's preferences, see "Wrap days at".)
Even after following the steps above, Timing does not seem to record paths for a particular application.
There are some apps that simply offer no way whatsoever to extract path information from them.
In such cases, you might still be able to figure out what you were working on via the "Details" screen.
In addition, you can select the time range corresponding to these activities on the timeline, then press the "Add Time Entry" button to manually create a time entry, explaining what you have been working on in the time entry's "Title" and "Notes" fields.
Also, there are apps for which Timing can track only the window title. In that case, you could ask the app's developers to put more meaningful information into the window title. They could also reach out to us; we can provide them with specific guidance on how to easily (about ten lines of code) provide even more detailed information to Timing via a special AppleScript event handler.
Is there a way to export my activities?
Yes. We have a dedicated article on that.
Where does Timing store its data?
Timing normally stores its data in the Library/Application Support/info.eurocomp.Timing2 directory of your user folder. There are also cases where it stores its data in Library/Application Support/info.eurocomp.Timing, Library/Application Support/info.eurocomp.Timing-lite, or Library/Application Support/info.eurocomp.Timing-setapp. The easiest way to reveal your database is by clicking this link and allowing it to open Timing.
Library folder is hidden on most Macs. You can open it by selecting the "Go to Folder" option in the Finder's "Go" menu and entering ~/Library.
If you'd like to e.g. restore your Timing data from a backup, simply copy those folders mentioned above to the same places on your new system.
If you'd like to transfer your Timing license to a new Mac, please have a look at the corresponding FAQ entry.
Starting over from scratch
If you'd like to start over from scratch, simply delete the folders mentioned above (although we recommend backing them up first).
You can then have Timing re-create its sample projects and filters by clicking the following three links and allowing them to open Timing:
- Allow re-creating sample projects or filters
- Re-create sample projects on next launch
- Re-create sample filters on next launch
Note that if you have a Timing Sync account, your data would be restored once you log back into Timing Sync; let us know if you'd like us to delete your sync account as well, so you can create a new one without the existing data.
The app's settings are stored in the Library/Preferences directory of your user folder, with filenames info.eurocomp.Timing2.plist and info.eurocomp.TimingHelper.plist. There might also be preferences in info.eurocomp.Timing.plist, info.eurocomp.Timing-lite.plist, info.eurocomp.Timing-setapp.plist, or info.eurocomp.Timing-setapp.TimingHelper.plist.
Idle Time & Manual Tracking
Will Timing track the time I don't spend at my Mac?
Timing will automatically suspend tracking after a configurable time of inactivity (3 minutes by default, but can also be disabled altogether). It will resume as soon as you return to the Mac. In addition, idle time tracking is disabled when the frontmost app prevents your screen from going dark.
How can I verify that Timing's idle time detection and "Ask for Activity after Being Idle" is working?
As soon as Timing detects that you are idle, its icon will fade a bit (i.e. it becomes a bit "grayer" than pure black).
The next time you e.g. move the mouse after the icon has faded, Timing will present a "What Did You Do?" pop-up if you have enabled that in the preferences.
To make idle time detection kick in faster for testing purposes, you can also reduce the idle time delay in the preferences.
Please note that there are a few limitations to idle time detection:
- Timing only looks for keyboard and mouse activity in determining idleness. When you use either, the timer resets.
- Timing only asks you what you did when you have been idle for at least five minutes, to avoid annoying you with a popover after just a minute. If you would like to change that behavior, please contact us.
- We try to detect when an app keeps your Mac awake (e.g. when watching a video, having a video call or some other app using e.g. the microphone) and disable idle tracking in this case.
This also applies to e.g. giving presentations and using an app in full-screen mode. - Correspondingly, some apps intended to prevent your Mac from going to sleep (e.g. Caffeine) will also prevent idle detection.
- Note that Timing will consider a running screensaver as idle time, so if you set your screensaver to kick in after five minutes, Timing will consider you as idle from then on.
- Timing will not ask you what you did if you have been idle for more than ten hours, to avoid asking you every morning.
-
Timing's idle time detection only applies to its app activity tracking, but not to timers. If you manually tell Timing to track you by starting a timer, it assumes that you explicitly want it to track that timer even when you are not using your Mac. This lets you e.g. start a timer for a meeting, attend that meeting without using your Mac, but have that time still tracked. Consequently, while a timer is running, Timing will not ask you to enter idle time whenever you return to your Mac.
The only exception to this is when your Mac goes to sleep; then the timer is stopped as well.
If you want Timing to automatically stop your timers whenever you become idle, please contact us.
Can I enter time manually?
Yes. Just click the Timing menu item and select 'Start Timer'. In addition, the menu item has an option to automatically ask you what you did when you return to your Mac after having been idle.
Permissions & Setup
Why is Timing asking me to enable Accessibility support?
Timing has been designed to not only track the application you are currently working in, but also which specific document you are editing. In order to be able to find out the path to that document, a specific setting in System Preferences needs to be enabled. You can do so via the following procedure:
- Open the Security & Privacy preference pane from the System Preferences application.
Alternatively, click this link to open the correct preference pane. - Navigate to the Accessibility section of the Privacy pane:
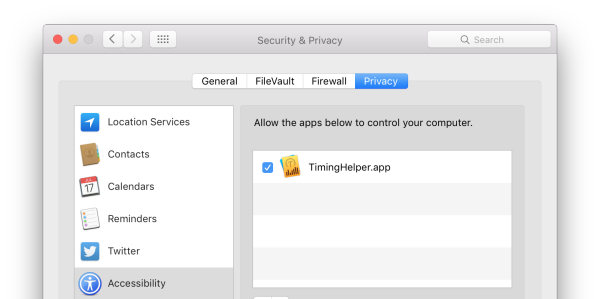
- Enable TimingHelper in the list of applications.
What is "Advanced Accessibility tracking"?
For a few apps (such as Firefox, Slack and Notion), Timing can actively enable Accessibility support in these apps to provide more detailed tracking.
Enabling this tracking can cause issues in conjunction with e.g. "window management" apps, so you can disable this option in the "Accessibility" Timing preferences.
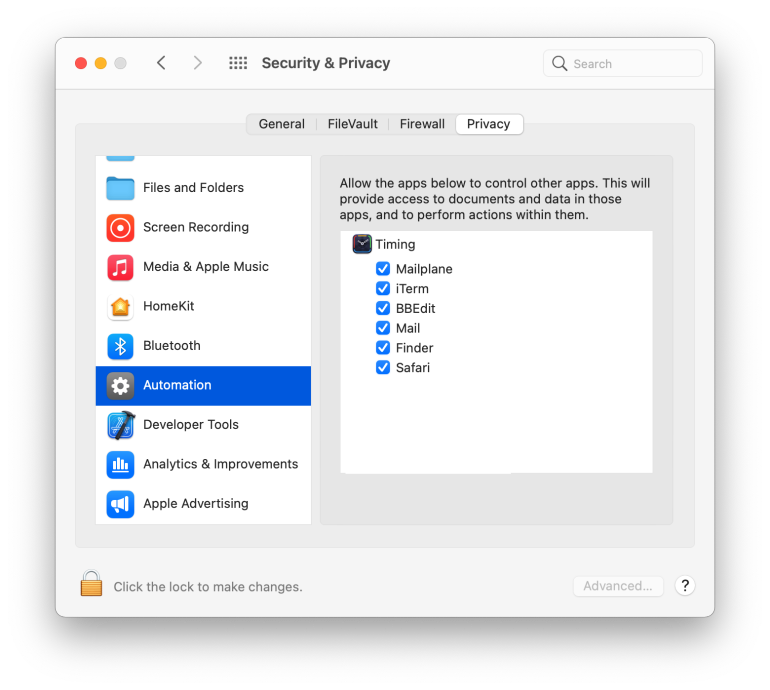
What about these '"Timing.app" wants to control "Safari.app"' messages? How can I grant these AppleScript or Automation permissions if I had denied them earlier?
After installing Timing, you might receive dialogs like the following:
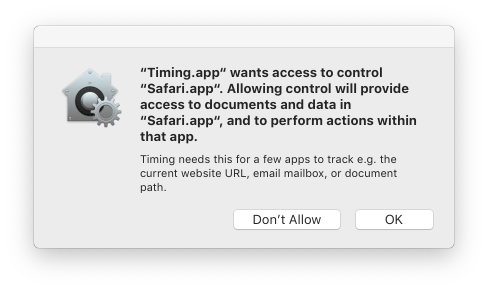 These dialogs appear when Timing needs to use AppleScript in order to track more detailed information. We try to show such dialogs as rarely as possible, but you might see them when using Safari, Chrome, Finder, and Mail, for example. Some third-party apps (for example Ulysses, Mailplane, Bear, Dash and Opera) are affected as well.
In case you encounter a dialog like this, please make sure to click "OK" to avoid missing information in your Timing history. Unfortunately, macOS does not let you approve this access for all apps at once. In case you accidentally clicked "Don't Allow" for one of these apps, don't worry, you can still authorize this later on in the "Security & Privacy" pane of System Preferences. Just make sure to check all marks below "Timing.app":
Why does Timing ask for permission to record my screen?
Some apps, such as Adobe Premiere Pro, do not share their window title through the Accessibility API. This means that Timing can't track window titles for such apps unless it uses an alternative method called the CGWindow API. This method requires the Screen Recording permission to provide the window title. It does not record your actual screen, but rather uses this permission to access and track the window title of the app in focus when the Accessibility API is not sufficient. By doing this, Timing can still accurately monitor and log your usage of applications that don't readily make their window titles available via Accessibility.
If you would like to review the Screen Recording permission, you can do so in the "Security & Privacy" pane of System Settings.
Sync, Mobile & Workflow
Can I sync my data between multiple Macs?
Yes, Timing has a built-in sync service. Please see our article on Timing's cloud sync functionality for more details on that service.
Is there an iOS/iPhone/iPad/Android companion app for Timing?
We offer a web app for starting and stopping timers on the go that syncs with your Mac. Simply go to https://web.timingapp.com and tap the 'Share' button, followed by 'Add to Home Screen'. From then on, you have a Timing icon on your home screen to quickly start and stop timers right from your iPhone, iPad or Android device.
In addition, you can also use the following two methods to quickly add time spent on the go after the fact:
- If you create a calendar event for the time spent on the go (e.g. in the calendar app on your iPhone/iPad), you can have Timing Expert show these events in the timeline and add them as time entries with just one click. See our article on Timing's calendar integration for a more detailed explanation.
- You can also click any of the grey '+' boxes in the timeline to fill that gap with a time entry. See our documentation on time entries for details.
Timing also integrates with Apple's Screen Time system to import and show your iPhone and iPad usage in Timing on your Mac. However, please note that this feature is experimental and may stop working in future iOS or macOS updates. For more information on setting up this integration, please refer to our documentation of this feature.
How is the Productivity Score calculated?
Each Project in Timing has a specific Productivity Rating assigned to it.
To calculate your Productivity Score, Timing simply takes the average of all those Productivity Ratings weighted by the time you spend on the corresponding project.
So if you spend e.g. two hours in a 100% project and one hour in a 25% productive project, your overall Productivity Score would be (2 hours * 100% + 1 hour * 25%) / (3 hours) = 75%.
Is there a hotkey for displaying today's data?
Yes — ⌘⌥1. If you would rather use a different hotkey (e.g. ⌘T), you can override it yourself as described in e.g. this article.
I have received a message saying that I can't re-assign app activities that are part of a time entry. What does that mean?
To avoid double-counting time, Timing can only assign a given period of time to at most one project.
In case a period of time is covered both by an app activity and a time entry, these two might be assigned to different projects, causing a conflict.
In that case, Timing will always count the time towards the time entry's project, so assigning the app activity to another project will have no effect.
So if you'd like to assign that time to a different project, you'll need to re-assign the corresponding time entry instead.
The easiest way to do so is by switching to the Reports tab and selecting one of the 'Timesheet' presets, as these list all time entries in an orderly fashion.
Then, simply drag the time entries in question onto the desired project.
Billing & Licensing
How long is the free trial?
30 days.
How can I uninstall Timing?
See here.
How can I cancel my subscription?
See here.
I can't find a place to enter my license key?
Chances are that you have a license key for Timing 1 but installed Timing 2, which uses activation links instead.
If you would rather keep using Timing 1, you can download it here.
However, Timing 2 has been rewritten from scratch and is much, much better, so we really recommend trying it out!
How can I activate Timing on another Mac?
Back when you subscribed to Timing, you received a link to activate your subscription. Simply click that link on your new Mac with the Timing app already installed to activate the subscription on the new Mac. If you can't find your activation link, please click here, then enter the email address you used to subscribe.
Please keep in mind that each Timing license is only good for one person, and for at most 1/2/3 Macs (depending on whether you have Timing Professional, Expert or Connect).
Please refer to our Pricing page for more details.
Why do I have multiple copies of the Timing tracker app running? What can I do about this?
This is usually caused by e.g. cleaning login items with CleanMyMac or MacCleaner. Please try the following steps:
- Open Terminal.app.
- In the window that appears, paste the following code exactly, then hit return:
launchctl list | grep TimingHelper | cut -f 3 | while read service; do launchctl disable gui/$(id -u)/$service; done - Reboot your Mac.
Afterwards, Timing should no longer launch at all at login. You can then enable the "Launch at login" feature again in the Timing preferences to have the menu item launch only once at login. In case this procedure does not work for you, please contact support with a screenshot of the Terminal window showing the commands you entered.
Are there versions of Timing for Windows or Linux?
Not right now. For Windows, we recommend to have a look at ProcrastiTracker or ManicTime. We do not have specific recommendations right now for Linux; let us know if you know of one.
Technical Issues
I am getting an alert about an issue with Accessibility tracking. What is that about?
In some rare cases, macOS seems to "forget" that you have granted Timing the permission to track other apps via its "Accessibility" system. In these cases, it usually helps to uncheck and then re-check the "Timing Tracker" item in the "Accessibility" pane of your "Security & Privacy" System Preferences:
- Click this link to open System Preferences.
- Click the "lock" icon at the bottom of the window to unlock the preference pane.
- Click the "Timing Tracker" item to uncheck it, then click it another time to make sure that it is checked.
If you are still encountering issues after unchecking and re-checking this permission or have any questions about this problem, please feel free to contact us.
I am getting an error saying that my database is corrupted, or that the "database disk image is malformed". What shall I do?
First of all, sorry about that! This can happen under rare circumstances, but appears to happen more frequently when restoring from a Time Machine backup.
To fix this issue, if you are signed into Timing Sync, try the following:
- Quit Timing and the Timing tracker app (the status icon in the top right of your screen).
- Click this link and allow it
to open Timing in order to reveal your Timing database in the Finder.
Then, rename your whole data directory to something else, e.g.
info.eurocomp.Timing2-backup. Alternatively, you can copy and paste the following command into a Terminal window, then press return:mv "Library/Application Support/info.eurocomp.Timing2" "Library/Application Support/info.eurocomp.Timing2-old" - Relaunch Timing and sign back into sync. Once your sync data has been downloaded and applied, all your data should be back.
If you are not signed into Timing Sync, please try the following:
- Quit Timing and the Timing tracker app (the status icon in the top right of your screen).
- Click this link and allow it to open Timing in order to reveal your Timing database in the Finder.
- Create a sub-directory named
oldin that directory, then move the following files into the new sub-directory:SQLite.db-shmSQLite.db-walsync.dbsync.db-shmsync.db-wal
SQLite.dbfile itself. - Relaunch Timing. All but the most recent data should be available again.
If this method does not work, you can try to restore your Timing database (its location is explained here) to one of the backup versions (preferably one that was created before you restored your Time Machine backup) in ZIP archives that should be stored in the backups folder alongside the regular data (and quit Timing and the menu item before doing so, of course).
If you are still encountering issues or have any questions about this process, feel free to contact us.
My question has not been answered here. How can I contact you?
If you have any further questions, you can email us.