Projects
Timing's automatic time tracking is great for recording which apps, documents, and websites you have been using. But that information is so fine-grained that it is easy to miss the bigger picture:
What have you actually worked on?
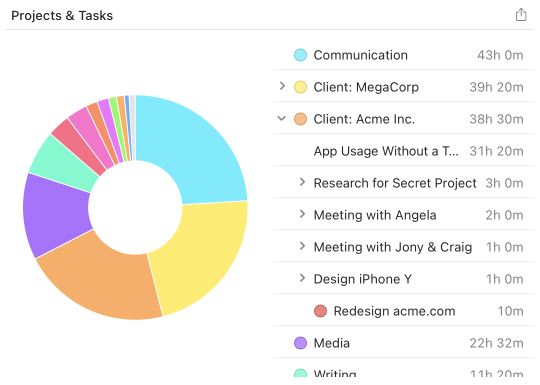
That's where "projects" come into play. Projects are simply buckets of time that you can assign your app usage and time entries to. Once you've done that, these times will count towards that project's total in various reports throughout the app, giving you a quick high-level overview of what you spent your time on. For example, the "Overview" screen shows how your time is distributed across projects:
While Timing calls them "Project", you can also use them for any other thing you want to record time for, such as freelancing clients, actual projects you work on, or individual activities that you do for work (e.g. "Research"). How you structure your projects is entirely up to you, but for freelancers a three-tier project structure ("Clients" containing "Projects" containing "Sub-Projects" or individual time entries) as outlined in this article has proven successful. Read on for instructions on how to actually create such sub-projects.
Table of Contents
Creating a Project
Let's start by creating a project. To achieve that, let's create a project by clicking the '+' button in the sidebar's project list:
Don't worry about all the fields in the dialog that pops up; we'll get to those later. Just enter a title and press "Create Project".
Assigning Time to Projects
Now that we have our first custom project, let's talk about how you actually assign time to it.
The easiest way is to simply drag an item from one of Timing's activity lists onto a project:
In addition, whenever you create a time entry, the entire timespan of that entry will be associated with the project you select for the entry. There are plenty of ways to create time entries; you can find them all in the documentation on time entries.
Creating Rules
Dragging the same kinds of activities onto the same projects gets old very quickly. That's why Timing lets you create rules: when you keep the ⌥ key pressed while dragging an activity onto a project, Timing will automatically assign all future activities of this kind to that project as well.
In addition, when you create a new project, Timing offers to automatically add a rule to match times containing the project's name in their title or path to the new project. This saves you time categorizing activities and/or creating rules manually, as e.g. all times spent in a folder for that project would automatically be assigned to the project, without any extra effort on your part.
You can compose even more powerful rules manually using Timing's rule editor; please refer to the corresponding knowledge base article on rules for more details.
The Project Drop Zone
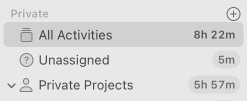
At the bottom of the sidebar, you will find a persistent drop zone that offers a quick way to create new projects from activities, files, or folders — all in a single drag. Instead of first creating a project and then dragging content onto it, the drop zone combines both steps into one action.
When you are not dragging anything, the drop zone shows a hint text and acts as a clickable button: clicking it opens a folder picker that lets you choose one or more folders to create projects from.
Dropping Activities
Drag one or more activities from any activity list onto the drop zone to create a new project and assign the dragged activities to it in one step. If Timing can derive a meaningful project name from the dragged activities (for example from a file path or other grouping information), the project will automatically get an appropriate name and a matching rule. Otherwise, a generic "Project" will be created and the project name editor will appear so you can name it.
Dropping Files and Folders from Finder
You can also drag files or folders directly from Finder onto the drop zone. This creates a project named after the item, with a rule matching its path. When dropping multiple files or folders, Timing creates a single project named after their common parent folder, with a rule for each item.
Creating Sub-Projects with the Drop Zone
If you have a project selected in the sidebar when you drop, the new project will be created as a sub-project under the selected project, instead of at the top level. The drop zone text will adapt to reflect this (e.g. "Drop to create sub-project").
When dropping two or more items (activities, files, or folders), you can hold the ⌘ (Command) key to create separate sub-projects for each item or group of activities. Without ⌘, all items are grouped into a single project. With ⌘:
- Without a project selected: a new parent project is created (named after the common path), with a sub-project for each dragged item.
- With a project selected: sub-projects are added directly under the selected project, without creating an intermediate parent.
Drag Feedback
While dragging, Timing provides visual feedback to help you understand what will happen when you drop:
- The sidebar highlights with a border and tinted background, showing that it is ready to accept the drag.
- A floating panel near the cursor shows contextual text describing what will happen if you drop at the current location — whether you are hovering over a project or the drop zone. The panel also shows modifier key hints (e.g. "Hold ⌥ to create rule" or "Hold ⌘ for separate sub-projects").
- The drop zone text updates to show the projected project name (e.g. "Drop to create 'Documents'") and, for multiple items, how many rules will be created.
- Pressing modifier keys (⌘ or ⌥) updates the feedback instantly to confirm.
Hiding the Drop Zone
If you prefer a cleaner sidebar without the drop zone, you can hide it via View > Always Show Project Drop Zone in the menu bar, or by right-clicking the drop zone itself and deselecting the option. When unchecked, the drop zone will still appear temporarily when you drag activities, files, or folders, but will be hidden otherwise. The setting persists across sessions, and you can re-enable the drop zone at any time using the same menu option.
The Project Editor
When you had created your first project above, you already had a brief encounter with the project editor.
You can also trigger it by double-clicking an existing project in the sidebar:
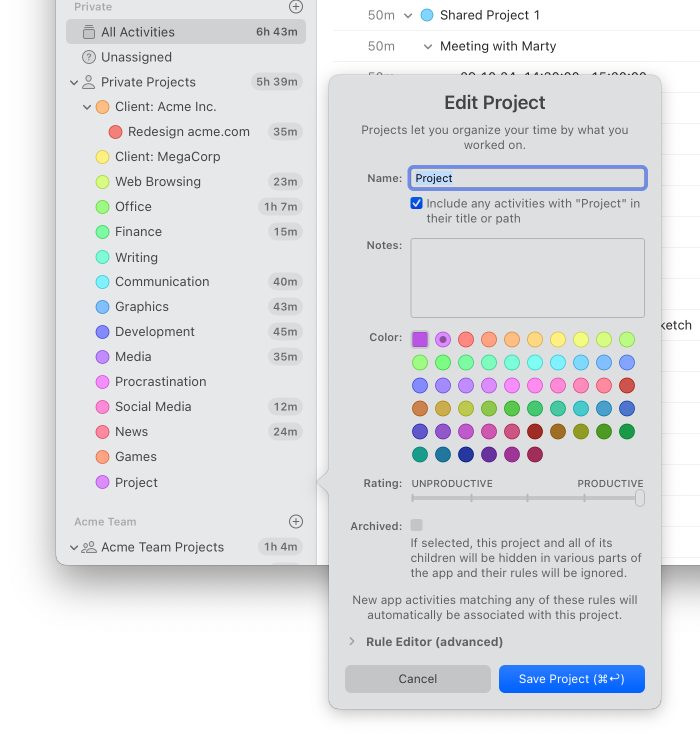
It lets you edit all the project's properties:
- Picking a name for the project should be self-explanatory.
-
You also have the option to automatically add a rule to match times
containing the project's name in their title or path to the new project. This saves you time
categorizing activities and/or creating rules manually, as e.g. all times spent in a folder for that
project would automatically be assigned to the project, without any extra effort on your part.
Under the hood, this will simply create a "Title or Path contains 'Project Name'" rule for you; you can always edit or delete this rule later. - Notes let you quickly jot down any information you might need to remember about the project. This is intended more as a quick reference for yourself than for long-form notes, though.
- You can also pick a color for the project. The first button opens a panel that lets you pick an arbitrary color, while the other colored dots allow you to pick from a selection of predefined colors.
- Each project also has a productivity rating.
Timing uses this rating to compute your productivity score on the Overview screen.
New projects start with a "neutral" productivity rating, so you might want to adjust this. - If you select the option to archive a project, it will be hidden from the project list and its rules will be ignored.
- If you have enabled billing status tracking, you can also set a default billing status for the project. This determines what billing status new time entries in this project will have by default (e.g. "Billable" for client work, "Not Billable" for internal projects). You can choose "Automatic" to inherit the default from the project's parent, from your team's default (if the project belongs to a team), or from your global preferences.
- If you want to make manual changes to the project's rule, click the triangle next to Rule Editor.
In that case, please make sure to read our in-depth article on editing rules.
The "Unassigned" Pseudo-Project
Once you have assigned a substantial portion of your time to various projects, it becomes more difficult to figure out which times you have not assigned yet. The "Unassigned" pseudo-project makes this easier by showing you only the activities that do not belong to any project yet. Simply select "Unassigned" in the sidebar to enable this filter, then start assigning the activities you see in your lists.
Rearranging Projects
Often, one big "Project" actually consists of several smaller parts.
To reflect this relationship in Timing, you can drag other projects onto a project to add them as sub-projects.
Alternatively, when you create a new project by clicking the '+'
button while another project is selected, it will be added as a sub-project to the selected one.
If you want to include a project's sub-projects in its total time, try collapsing the parent project via the triangle next to it:
 Alternatively, you can ⌘- or ⇧-click on the project list to select multiple projects at once.
To quickly organize your sub-projects, right-click on any parent project to access additional options:
- Order Sub-Projects Alphabetically sorts all direct sub-projects of the selected project in alphabetical order. Hold the ⌥ (Option) key while clicking to sort all nested sub-projects recursively.
- Reassign Sub-Project Colors automatically assigns new colors to all direct sub-projects, distributing them evenly across the color spectrum based on the parent project's color. This is useful when you have previously re-arranged your project hierarchy, causing the sub-project colors to no longer be consistent. Hold the ⌥ (Option) key while clicking to reassign colors recursively to all nested sub-projects as well.
Archiving Projects
Over time, your project list might get cluttered with entries that are no longer relevant, such as past clients. For this case, Timing offers the option to mark a project as "archived". Once you've done that via the project's context menu or editor, Timing will automatically hide it from the project list and stop applying rules for it. You will also no longer see time entry title suggestions for that project, which should make it easier to find the project you actually need when starting a new timer easier.
And if you ever need to show archived projects again, you can do so by selecting the "Show Archived Projects" option from either the "View" menu or the project list's context menu.