Rules In-Depth
Timing's rules system is very powerful, but it can also be a bit overwhelming to beginners.
This article covers everything you need to know to create sophisticated rules.
Table of Contents
What are Rules?
Rules are Timing's way of automatically determining what projects and filters an app activity belongs to.
They are applied differently for projects and filters:
- Project rules are applied once a new app activity has been tracked:
After Timing has recorded a new app activity, it will go through all projects and check if the project's rule matches the app activity.
The app activity will then be assigned to the first project with a matching rule.
In particular, changing a project's rule does not affect any app activities tracked so far — it will only apply to new app activities tracked from now on.
Have a look at What if an activity would match several rules? on how the order of project rules is determined. - Filter rules are applied whenever they are selected:
When you select a filter in Timing's filter list, Timing will go through all app activities it is currently displaying and only keep the ones that match the filter's rules.
In particular, the filter's rule applies to all app activities Timing has tracked — not just new ones.
There are two main reasons why project rules can't be applied retroactively:
- Projects also let you manually re-assign past activities for refinement. This would be nearly impossible if those re-assignments conflicted with some rules.
- Activities can only be assigned to one project at a time, to make projects act as "buckets". This would be nearly impossible to realize if rules also applied retroactively.
Another big difference between projects and filters is that an activity can only be assigned to at most a single project, but multiple filters (i.e. filters can overlap).
See this article for details.
Note that rules always only apply to app activities, not time entries.
Editing Rules
With that out of the way, how can we create or edit a project's (or filter's) rule?
The easiest way to add a rule is simply by dragging an element from the "Activities"
screen onto the project/filter while keeping the ⌥ key pressed.
Often, simply adding a few file paths or domains as a rule will go a long way towards categorizing your activities.
In addition, when you create a new project, Timing offers to automatically add a rule to match times containing the project's name in their title or path to the new project. This saves you time categorizing activities and/or creating rules manually, as e.g. all times spent in a folder for that project would automatically be assigned to the project, without any extra effort on your part.
In case you do need to add more complex rules or edit an existing one, double-click the project/filter to edit it, then click the triangle next to "Rule Editor":
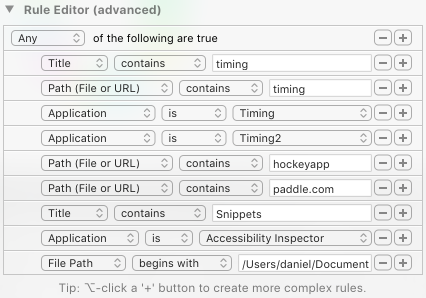 Wow, quite a lot!
We'll now go through all possible rule types one by one.
Nested Rules
At the root of a project's rule is always a compound rule.
Those rules consist of several sub-rules, and they match either when at least one (called "Any" in the rule editor) or all of their subrules match, depending on the rule type.
In most cases, the root rule will be of the "Any" type to allow matching by several different subrules.
If you need to create a nested sub-rule (e.g. title contains x AND title contains y), hold ⌥ pressed while clicking the + button.
Creating Nested Rules Using String Operators
Alternatively, you can also use logical operators directly in string expressions for certain types of rules. Timing supports:
- || (OR) operator: Title contains "value1 || value2" matches if the title contains either "value1" or "value2".
- && (AND) operator: Title contains "value1 && value2" matches if the title contains both "value1" and "value2".
For complex conditions with both operators, Timing follows standard operator precedence where AND (&&) has higher priority than OR (||). For example, Title contains "value1 && value2 || value3 && value4" is interpreted as (Title contains "value1" AND Title contains "value2") OR (Title contains "value3" AND Title contains "value4"). Note that Timing will not parse parentheses in string expressions; if you need different grouping, you can still use nested rules for more control.
These string operators provide a convenient shorthand for creating complex matching conditions without having to create multiple nested rules. Whitespace around operators is automatically trimmed, and empty components after trimming are ignored.
Property Rules
In order to create a useful rule, compound rules are not enough.
We need to apply some criteria to one of the app activity's properties, after all!
To create good rules, we recommend using the "Activities" screen for reference, as it gives you the most comprehensive
picture of what data your rules could match on.
Property rules consist of three parts:
- The property we want to match on. You can select one of the following:
- Keywords. These are all the keywords extracted from the app activity's title and path.
Note that keywords are always single lowercase words, so rules like Keywords contain 'foo bar' or Keywords contain 'Foo' will never match.
If you want to match multiple keywords, use a compound rule like this instead:
- Domain (e.g xyz.com). If the activity is about visiting a website, this is the website's domain.
E.g. for http://timingapp.com/xyz and https://timingapp.com/xyz this would be timingapp.com, while for http://www.timingapp.com/xyz it would be www.timingapp.com. - Full Website URL. When visiting a website, the full website URL.
For e.g. https://www.timingapp.com/xyz?abc this would be the full https://www.timingapp.com/xyz?abc. - File Path. When the activity is about viewing or editing a file, this contains the file's path in a normalized fashion, e.g. /Users/daniel/Documents/file.txt
- Title. The window title or document title Timing extracted for the app activity.
Depending on the app, this is often just the app's name, the name of a screen in the app, or the name of the edited document. - Path (File or URL). The path Timing extracted for the app activity.
This also depends on the app and often is a website URL or a file path (see above).
There are a few special cases — for example, in Mail.app the path represents the mailbox hierarchy the current email is in (which is neither a file path nor a URL, but still a kind of path).
The keywords, domain, full website URL or file path properties from above are more specific, so it is recommended to use those instead if possible. - Title or Path. This rule can match either the title or the path.
This is useful if you want to match e.g. both the title and the path of an app activity, but don't want to create two separate rules for that. - Application. The application you were using.
- Application Name. The name of the application you were using. If you are using multiple applications with the same name (e.g. both testing and production versions), this is useful to match all of them with just one rule. Not to be mistaken with "Title", which refers to the current activity (usually the window title) rather than the application's name.
- Device. The device this activity was recorded on. This is useful to restrict rules to apply on specific Macs only, or to create a filter that only shows the activities from one particular Mac.
- Start Time. The time of day when the activity started. This rule lets you specify a start and end time to match activities that started within that time window. This is useful for categorizing activities based on when they occurred during the day — for example, to distinguish between work done during regular business hours versus after hours.
- Day of Week. The day of the week when the activity occurred. This rule lets you specify a day of the week (or all weekdays or weekend days) to match activities that occurred on those days. This e.g. allows you to quickly filter for work that you did on weekdays or weekends.
- Keywords. These are all the keywords extracted from the app activity's title and path.
- The relation the property should have to the value we specify.
The possible relations depend on the property the rule is about — for keywords this can e.g. only be "contain", meaning that one of the app activity's keywords is the word in the text box on the right.
For string properties, this can be one of the following:- contains. The property must contain the string specified in the text box on the right.
- is. The property must be identical to the string specified in the text box on the right.
- begins with. The property must begin with the string specified in the text box on the right.
- ends with. The property must end with the string specified in the text box on the right.
- is like. The property must match the string specified in the text box on the right.
? and * are allowed as wildcard characters, where ? matches exactly one character and * matches zero or more characters. - is not. The property must not be identical to the string specified in the text box on the right.
- matches regex. The property must match the regular expression specified in the text box on the right.
The pattern is searched within the property value (similar to contains), so you can use ^ and $ as anchors if you need the pattern to match the start or end of the value.
Note that the "Domain" and "Application" properties also have a special "in" relation available. These are for use in the sample projects (to match e.g. the graphics editing applications Timing knows about) and are not recommended for your own use.
Similarly, the "Start Time" property has a special "is between" relation available, which lets you specify a start and end time to match activities that started within that time window. - The value the rule will be checking for.
In most cases this is simply a string as explained above, e.g. a domain like "timingapp.com".
For string values, you can also use logical operators within the string:- || (OR): "value1 || value2" will match if the property matches either "value1" or "value2"
- && (AND): "value1 && value2" will match if the property matches both "value1" and "value2"
For the "Application" property you can select which application the rule should match (or not match).
What if an activity would match several rules?
Speaking of conflicts — sometimes an activity might match more than rule.
In that case, Timing will associate the activity with the first matching project it finds.
To determine which rule comes first, there's a pane in Timing's preferences. It lets you change the order in which Timing applies rules:
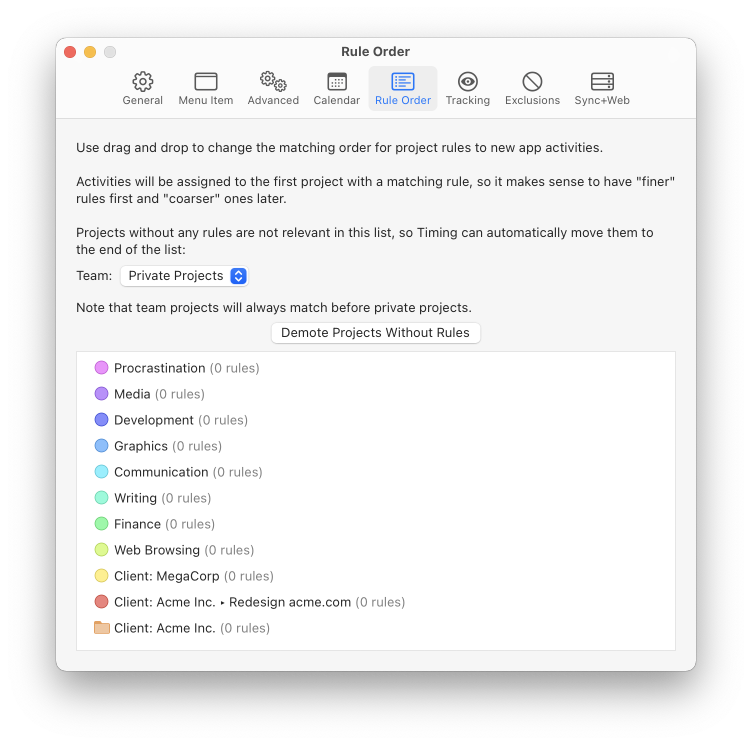 Newly created projects by default get the highest priority, so they will override the sample projects' rules.
Also, keep in mind that the order of rules that do not overlap does not make any difference; you only need to re-order rules that could match the same activity.
In addition, projects that do not contain any rules are not relevant for these checks, either. To that end, the preference pane includes a button to move all projects without rules to the bottom of the list, so you can focus on re-ordering only the relevant projects.
Re-applying project rules
Let's say, you are reviewing yesterday's data and notice that a couple of activities should always be assigned to the same project. Good thing that Timing supports rules to automate all these assignments in the future! But then you notice that the same kind of activities have already been recorded last week and last month. Now, repeating that same assignment again for all your past activities is no fun. That's where our feature to re-apply rules comes in: it re-applies all your project rules to a set of existing activities, saving you the work of assigning all these activities yourself.
You can activate this feature from the "Edit" menu or an individual project's context menu:
- Rules will only be re-applied to visible activities. To apply them to more activities, select a larger date range.
- When re-applying a single project's rules, Timing will still evaluate all project rules — it only changes the activity's project if no higher-priority rule also matches.
- Activities that don't match any rule are skipped, preserving manual project assignments.
Applying project rules to calendar events
When you e.g. click a calendar event on the timeline, Timing will also try to suggest a project for the new time entry based on the calendar event's properties. First, Timing will check if a previous time entry has been created for a calendar event with the same name. If that is the case, Timing will suggest the project that was used for that previous time entry. This is useful to consistently pick the same project for recurring events.
But if Timing can't identify a prior time entry with an identical event name, it will then try to apply your project rules to the event. However, given that a calendar event does not have the same properties as a regular app activity, property rules will be interpreted a bit differently:
- The Title field will contain the title of the calendar event.
- The Path (File or URL) field will contain the title of the calendar that the event is in.
- The Title or Path field will match either the event's title or the calendar's title.
- The Keywords field will contain only keywords extracted from the calendar event's title, but not from the containing calendar's title. This is to reduce the likelihood of all events in a particular calendar being assigned to the same project just because of a common keyword in the calendar's title.
- The Domain (e.g. xyz.com) and Full Website URL fields will contain the respective values obtained from the "URL" field of the calendar event. This is useful for e.g. associating all events conducted using a particular meeting service (which thus use that service's domain in their URL) with a specific project.
- All other fields (File Path, Application, Application Name, Device) will be treated as if they were empty.
If no project rule matches the event, Timing will then try to match the event to a project based on similarities in the event's or calendar's name with the project's name. You can learn more about this in the corresponding section of the calendar documentation.
Note that the previous section on re-applying project rules will not apply to calendar events — Timing uses project rules to suggest projects for calendar events, but given that you had the opportunity to choose a different project when you created that time entry, it will not automatically change the project of past time entries.
Specific Examples
How can I assign all time spent in a particular folder to a specific project?
Simply drag the desired folder from the Finder onto your project in the Timing sidebar. Or, if Timing has already tracked time in this folder, drag the folder from Timing's "Activities" screen onto the project in the sidebar while keeping the ⌥ key pressed. Alternatively, you can also manually add a "File Path begins with" rule to the project yourself.
Afterwards, any future time spent on files in this folder or any of its subdirectories will automatically be assigned to this project.
How can I assign all time spent on a particular website to a specific project?
Simply drag the desired domain from Timing's "Activities" screen onto the project in the sidebar while keeping the ⌥ key pressed. Alternatively, you can also manually add a "Domain is" rule to the project yourself.
Afterwards, any future time spent on this domain will automatically be assigned to this project.
Can I automatically categorize all time spent reading emails from a particular address?
If you are using Mail.app, this is possible.
Timing categorizes time spent reading in Mail.app as "(Inbox Name) > (Email Folders) > (Sender Address) > (Subject)", and these show up on the "Activities" screen:
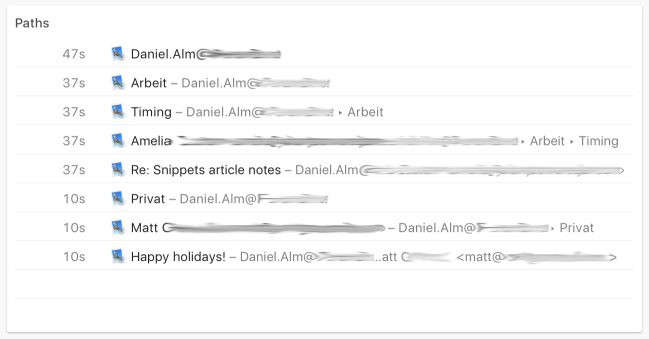 You can ⌥-drag an individual email, sender or folder from there onto a project to create a rule.
If you'd like to see time spent on individual emails, we recommend searching for them on the "Activities" screen.
So if you create a "Path contains '[email protected]'", rule, Timing will automatically assign all time spent reading emails by [email protected] to the corresponding project.
If you would rather like to categorize time for all emails from e.g. xyz.com, use "Path contains '@xyz.com'" instead.
Please note that this only applies to time spent reading emails, as Mail.app does not provide this kind of information when writing an email.
While you write an email, Timing will simply track the new email's subject.
Can I automatically categorize all time spent in a particular Slack team?
Yes. Simply ⌥-drag the corresponding channel or team from the "Activities" screen onto the corresponding project. Alternatively, you can create a rule of the form "'Title' contains 'Slack - <YourSlackTeam>'".
If you'd like to see time spent on individual Slack teams, we recommend searching for them on the "Activities" screen.
Please note that Timing can't always detect individual channels/DMs inside a team, as Slack makes it very hard to extract that data.
Can I automatically categorize all time spent in a particular Chrome or Safari profile?
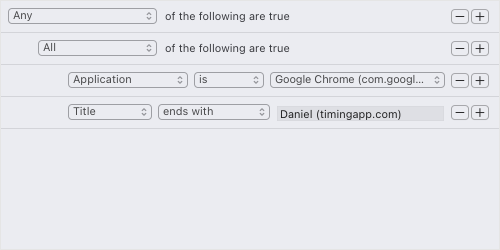
Yes. Google Chrome automatically appends your profile's name to the end of its window title. This means that you should be able to create a "'Window title' ends with <Profile Name>" rule in Timing to match browsing activity with the corresponding profile. For example, the following rule would match all time spent in a Chrome window with the profile name "Daniel (timingapp.com)":
Similarly, Safari 17 and newer automatically prepend your profile's name to the beginning of the window title, but Timing tries to move that to the end of the title, as that location is usually both more convenient and consistent with other browsers.
Likewise, for the Arc browser, Timing will append the name of the current space to the window title.
Similarly, for the Dia browser, Timing will append the profile name to the window title.
Please note that most browsers only include the profile name in their window title once you have created a second profile. If you are currently using only a single profile, the window title will not contain any profile name for rules to match against — create a second profile to trigger this.
You can check yourself whether the profile name is included in your window title by searching Timing's "Activities" screen for "Chrome" or "Safari" and then looking at the titles displayed for the corresponding activities.
Can I use rules to only show times recorded on a particular Mac or iOS device?
Yes. If you e.g. have an iMac and a MacBook Pro and want to see only activities from your iMac, you could create a filter called "iMac". Then, in that filter's rule editor, create a "Device is" rule and select your iMac in the rule's dropdown list. Once you select that filter in the list, only activities recorded on your iMac will be shown.
Please note that filters require Timing Expert. Please contact us if you would like a free trial for that version or want to upgrade.
How can I use time-based rules to separate work and personal activities?
Timing's time-based rules let you automatically categorize activities based on when they occur. Here are some common use cases:
- Create a "Work Hours" filter with a "Start Time is between 9:00 AM and 5:00 PM" rule combined with a "Day of Week is a Weekday" rule to see only activities during business hours.
- Set up a project rule that assigns all development activities happening after 8:00 PM to a "Side Projects" project.
- Create a "Weekend Projects" filter that uses the "Day of Week is on the Weekend" rule to quickly review weekend activities.
These time-based rules can be combined with other rules using nested "All" rules. For example, you could create a rule that categorizes coding done during work hours differently from evening coding sessions.
Can I automatically categorize activities differently on weekends versus weekdays?
Yes. Using the "Day of Week" rule, you can create different categorization rules for weekdays and weekends. Simply create a rule with "Day of Week is a Weekday" or "Day of Week is on the Weekend", or select specific days of the week.
This is particularly useful when combined with other rules. For example, you could create a rule that assigns all browser activity on weekends to a "Personal" project, while browser activity during weekdays gets assigned to "Work".
You can also use the "Day of Week" rule in a filter to quickly review activities from specific days of the week, or e.g. compare your productivity on weekdays versus weekends.
I don't see a specific app in the app list. How can I add it?
Currently, the application rule list only contains any applications Timing has "seen" (i.e. tracked) before.
Simply open the app in question for a few seconds, switch to another app, click the Timing menu item (to update its database), then re-open the rule editor.
Alternatively, you can create an "Application Title contains" rule and enter the name of the desired application. This rule will then match any applications with that name, even if Timing has not recorded them before.
What are the contents of the predefined lists, e.g. "Social Media Applications" and "Social Media Websites"?
How can I edit them?
Currently, the contents of these lists are not visible or editable. However, the predefined lists are very short and not very interesting anyway, so we recommend not paying too much attention to them. Also, you can view which apps/domains you used have been assigned to that project simply by selecting the corresponding project, then looking at what shows up for that project on the "Activities" screen.
Also, you can add extra apps or websites to the same project, which is essentially equivalent to adding them to those lists:
Simply option-drag the app or domain in question from the "Activities" screen onto your project, as described above.
Troubleshooting Rules
If you are encountering an issue with rules not working as expected, that might have one of the following reasons:
- Rules apply only to future activities. See Re-applying project rules if you need to re-apply rules to past activities.
- Are there maybe other projects whose rules that take precedence over the desired project? Please see What if an activity would match several rules? for more information on that.
- Also note that it is often more accurate and convenient to create rules via drag-and-drop from the "Activities" screen rather than manually. Just drag an activity from the "Activities" screen while keeping the ⌥ key pressed to create a rule that will match all future activities of this kind to that project. You can verify whether a rule will be created by checking if the cursor shows a little "+" icon during the drag once the ⌥ key is pressed.
If any of the above explains the behavior you are seeing, feel free to let us know which one; maybe we can make that behavior more obvious to avoid confusion for other users in the future.
If all of this does not explain the issues you are seeing, we might be able to take a look at your rule configuration. To do so, please send the following information via our support form:
- A full, uncropped screenshot of your "Activities" screen showing the activities that you expected to be categorized differently.
- A full, uncropped screenshot of a project editor with the rule editor expanded. To edit a project, you can simply double-click it. Note that you can also take screenshots from Timing's built-in support form.
- A full, uncropped screenshot of your "Rule Order" preferences.
- If applicable, a quick screencast video (can also be created via the built-in support form) demonstrating how you use drag-and-drop to create a rule. Please also attach another screenshot of the rule editor, showing that the rule has not been created. You might need to scroll to the bottom of the rule editor to find the rule that was supposed to be created.