Time Entries
While most of Timing's time tracking is automatic, there are always some bits of time that "fall through the cracks".
For example, it is almost impossible to accurately assign every single one of the hundreds of things you do on your
Mac each day to the correct project. In addition, Timing can't automatically record time that you spend away from your Mac.
That's where "time entries" come in. They let you assign a fixed block of time to a project of your choosing, no matter whether Timing has already recorded any app usage for that period. This makes time entries ideal for a variety of use cases:
- Time entries allow you to be less diligent with assigning all your app usage, because the time entries will fill all the gaps. If you can skip all the small bits of unassigned app usage and use coarse time entries for those instead, that can save you a ton of time assigning your activities. We strongly recommend watching this video on the recommended workflow for using app usage and time entries together for best results.
- Keep track of times that you didn’t spent in front of a screen, but that you still want to be accounted for. Meetings and calendar appointments would be examples for that.
- Quickly assign all times in a particular range of time to a particular project. For example, you could describe what task you performed and why, rather than just seeing the apps that were used.
- Annotate ranges of time with a more detailed description (time entry title and notes) than what is possible with app usage.
- Fill short as well as long gaps in your tracking.
- Time entries are more easily exportable to e.g. Zapier, the Web API, and invoicing tools.
- Time entries also make for a cleaner timesheet to provide to clients for billing purposes.
- If time is double-counted because you were active on two devices at the same time, you can create a time entry covering that time range to prevent double-counting.
Table of Contents
Video Tutorial: Combining App Usage and Time Entries, for the Best of Both Worlds
Creating Time Entries
Because time entries are so important for assessing your time accurately, Timing provides plenty of methods to create them, depending on your use case and work context.
From the Timeline
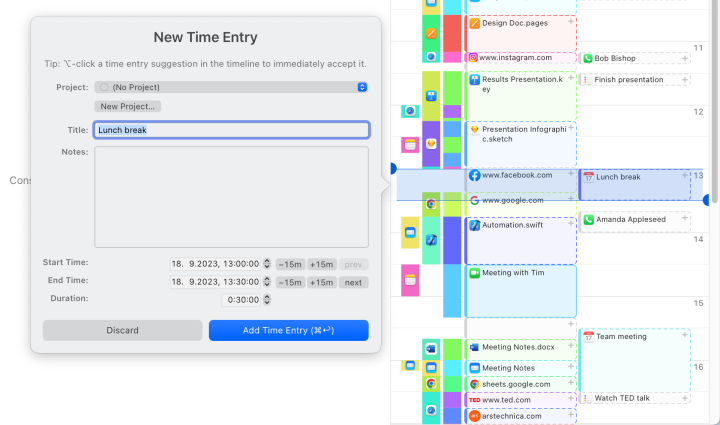
Timing automatically recognizes blocks of time when you have worked on a particular project.
It will highlight these as colored blocks with a '+' sign in the timeline on your "Review" and "Details" screens:
If you have enabled Timing's AI summary functionality, Timing will also automatically summarize what you did during these blocks of time.
When you click one of these suggestions, a time entry editor will open, allowing you to adjust the suggested time entry before saving it. On that editor, Timing will offer an auto-complete suggestion to use the AI summary as a title for the time entry; simply double-click that suggestion to accept it. As an alternative, if you double-click that suggestion with the ⌥ key pressed, Timing will use the summary for the notes field of the time entry instead. This is particularly useful when you e.g. want to include the summary on your time entry, but still want to use your own title for it.
You can also click and drag on the timeline to select a specific time range. Then, click the button that represents the time range you just selected in order to create a new time entry covering that range.
When a Meeting has Ended Requires Timing Expert
Timing can automatically recognize whenever you start a video or audio call in many popular meeting apps.
Once a call has ended, you will receive a notification like this:
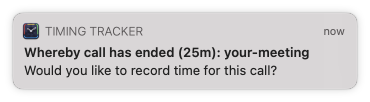
When you click that notification, you will be presented with a time entry editor to enter your meeting details. If you have allowed Timing to send notifications, there is nothing to set up — it just works!
If you have set up Timing's calendar integration, Timing will also suggest your recent calendar events for the time entry's title and project. This should make it easier to note down meeting details for e.g. Zoom meetings, for which Timing can't obtain meeting details directly from the Zoom app itself.
Call tracking is compatible with plenty of apps, including the following:
- Whereby
- Zoom
- Slack
- Microsoft Teams
- Google Meet
- FaceTime
- TeamViewer
You can configure this functionality using the "When a video call ends" setting in the Timing preferences.
Troubleshooting Call Tracking
If you are not seeing any notifications after a call has ended, please try the following steps:
- Please note that Timing will only notify you about calls that have lasted at least one minute. If you are testing this feature, make sure that your test calls last at least one minute. Alternatively, you can click the Timing icon in your Mac's menu bar a few seconds after starting a call; it should already show information about the call even before 60 seconds have passed.
- Make sure that you have allowed Timing to send notifications in the "Notifications" section of the macOS System Preferences.
- Similarly, make sure that you have not disabled notifications through some other means, e.g. by putting your Mac into "Do Not Disturb" mode.
- Check that the "When a video call ends" setting in the Timing preferences is enabled.
- Try restarting your Mac; sometimes macOS can get into a state where Timing can no longer reliably detect calls.
- It is possible that calls are being detected, but no title can be detected for the call. Unfortunately, it is not possible for Timing to detect meeting titles for all kinds of video call services. In those cases, Timing should still show a notification, however. If you are in doubt about whether a particular service is supported, please feel free to reach out and ask.
Disabling Call Notifications for Specific Apps
If you use call tracking but want to stop receiving notifications for a specific app (e.g., you don't want to be notified about Slack calls but still want notifications for Zoom calls), you can disable call tracking for that app directly from the notification.
When a call ends and the notification appears, click "Don't Ask Again for This App" to permanently disable call notifications for that specific app. This is different from "Don't Ask Again", which disables call notifications for all apps.
From Your Calendar Requires Timing Expert
Once you have set up Timing's Calendar integration, your calendar events will start showing up on the timeline. Click an event to create a time entry:
By Starting and Stopping Timers
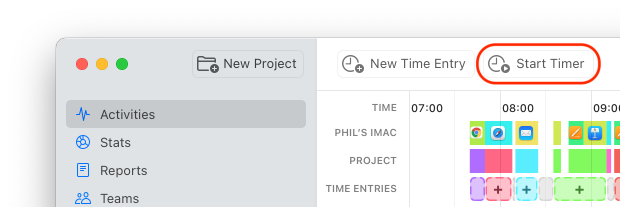
You can also create time entries by starting a timer from the Timing tracker app sitting in your Mac's status bar:
 Alternatively, this feature is also available from the main Timing app's toolbar:
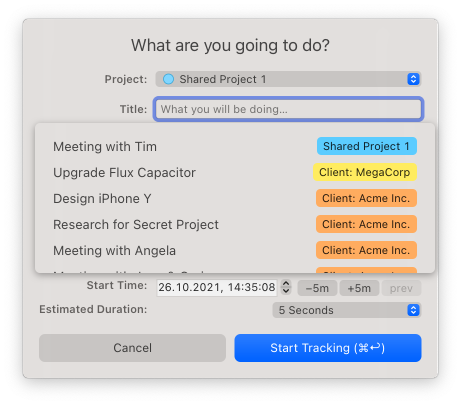
 When you start a timer this way, Timing will ask you for a few details, then assign all subsequent activities to the corresponding time entry until you stop it:
 After the estimated duration, Timing will check in with you whether you are still working on your timer.
You can also tweak the time at which the timer should have started by pressing the -5m/+5m buttons. This will move the start time back and forward by 5 minutes, respectively. If you keep the ⌥ key pressed while clicking these buttons, the time will shift by one minute instead, while the ⌘ key lets you jump in 15-minute intervals instead. Similarly, the "prev" button will move the timer's start time to the end time of the previous time entry, letting you seamlessly switch from one activity to another without leaving gaps in the timeline.
Finally, to save time, you can also start a new timer at any time by pressing the ⌃⌥⌘T shortcut.
In addition, the tracker app's menu also gives you the option to quickly resume your most recent timers without having to enter anything.
Pausing and Resuming Timers
When you click the Timing menu item, the "Quick Start Timer" list should contain your most recent timer at the top of the list. So the recommended way to pause and resume a timer is to simply stop it, then start the same timer again via the "Quick Start Timer" list later on. In addition, the "Start Timer" dialog triggered e.g. via the ⌃⌥⌘T shortcut should also suggest the timer you used previously at the very top of the list.
From Idle Time
If you enable idle time detection in the preferences, Timing will ask you what you did whenever you return to your Mac:
And if you forget to fill out this dialog, don't worry; you can still create time entries for idle time later on via the timeline.
As before, the "-5/+5m/prev/next" buttons will shift the time entry's start and end times as desired.
Automatically With the Entry-O-Matic Requires Timing Expert
You can also use Timing's "Entry-O-Matic" feature to automatically create time entries from the app usage that Timing has recorded for you:
You can find more information on the Entry-O-Matic in the documentation.
On the Go: Via the Web App
There are plenty of situations when you'd want to track time even when you are away from your Mac.
Make sure to install the Timing web app
onto your phone so that you can use it for quickly starting and stopping timers while on the go.
Manual Entry Via the Time Entry Editor
Finally, there's also the old-fashioned way of entering a time entry's properties manually:
- Click on the button labeled "New Time Entry" in the title bar of your Timing window.
- Select a project that the entry belongs to, or create a new project.
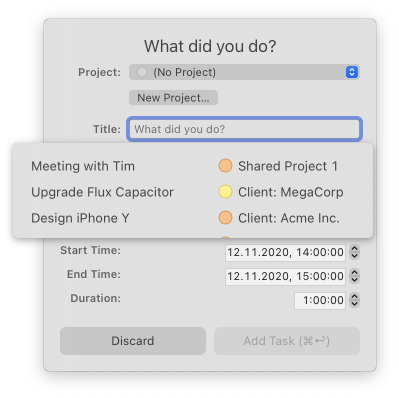
- Enter a title. Timing will automatically make suggestions based on your existing time entries and projects, or you can write a new one.
- If necessary, add notes.
- If billing status tracking is enabled, you can also set a billing status for the time entry. As a shortcut, you can type $ in the title field to quickly select a billing status from the autocomplete suggestions.
- Now, add a "start" and "stop" time. You can also click and drag on the timeline to set the entry's start and end times.
Billing Status
If you bill clients for your time, you can use Timing's billing status feature to track whether work has been billed and paid for. This makes it easy to keep track of which time entries you still need to invoice, which ones have been billed, and which ones have been paid. Please note that only time entries can have a billing status associated with them, but not app usage. When you want to bill time spent using your Mac, we always recommend creating time entries for billing those periods.
Enabling Billing Status Tracking
To enable billing status tracking, open Timing's preferences and go to the "Billing" tab. There, you can set a default billing status for new time entries:
- None: Disables the billing status feature entirely.
- Not Billable: New time entries will default to "Not Billable" (for internal tasks, learning, etc.).
- Billable: New time entries will default to "Billable" (work that can be billed but hasn't been yet).
Billing Status Values
Timing supports the following billing status values:
- Not Billable: Work that should not be billed to clients (internal tasks, learning, administrative work, etc.).
- Billable: Work that can be billed but hasn't been invoiced yet.
- Billed: Work that has been billed to the client but not yet paid.
- Paid: Work that has been billed and paid for.
- Undetermined: Time entries that were created before billing status tracking was enabled, or that don't have a billing status set yet.
Setting Default Billing Status for Projects
You can set a default billing status for each project by opening the project editor (double-click a project in the sidebar). This allows you to automatically assign the appropriate billing status to new time entries based on the project. For example, you might set client projects to default to "Billable" and internal projects to "Not Billable".
You can also choose "Automatic" for a project's default billing status, which means new time entries will inherit the billing status from the project's parent project, from your team's default (if the project belongs to a team), or from your global preference if neither of those are set.
Changing Billing Status
You can change the billing status of existing time entries in several ways:
- In the time entry editor: Double-click a time entry to open the time entry editor, then select a new billing status from the dropdown. Alternatively, you can type $ in the title field to quickly select a billing status from the autocomplete suggestions.
- Bulk changes via right-click: Select one or more time entries in an activity list, then right-click and choose "Set Billing Status" to update all selected entries at once. This is particularly useful for common workflows like marking all "Billable" entries as "Billed" after creating an invoice, or later marking "Billed" entries as "Paid" once you've received payment.
- Via AppleScript or the Web API: You can use the
update billing status for time entriesAppleScript command or the batch update API endpoint to change the billing status of one or more time entries programmatically. See the AppleScript documentation for details.
Editing Existing Time Entries
In some cases, you might want to edit or delete an entry that you have already created, rather than creating a new one. Timing offers several options for this:
Editing the Latest Time Entry
When you want to edit the most recent time entry, e.g. the one you just started or created, you can do so via the menu of the Timing tracker app in your status bar:
From the Timeline
You can also edit an entry from the timeline. To accomplish that, select the day on which the entry took place via the date range picker in the toolbar, then click the entry on the timeline to edit it. Alternatively, you can right-click the entry on the timeline, then press "Delete" to delete it.
From Activity Lists
If you do not remember which day exactly a time entry was on, consider selecting a long date range that should definitely include your entry, e.g. "Past 90 Days". Then, go to the "Details" screen in the Timing sidebar and look for your entry. If you can't find it right away, try entering part of the entry's title in the search field at the top right of the Timing window to filter for it.
You should now be able to see the desired entry in the activity list. Double-click the entry title to edit the title of all time entries with the same name in the selected date range. If you only want to edit a single occurrence of the entry, you can also click the small triangle next to the entry title to expand it, showing the time of each individual occurrence of this entry. You can double-click any of these to edit it, or right-click it to delete it.
Overlapping Time Entries
When you create a time entry in a range that already contains other time entries, Timing will give you the option to either replace the existing entries with the new one, or to create a new entry that overlaps with the existing ones. In the latter case, Timing will count the time that is covered by both entries twice. This is useful if you want to track time spent on multiple tasks at the same time, e.g. when you are working on a project while also attending a meeting.
Time Entries Capture App Usage
Please note that manual time entries represent you telling Timing what you've been working on, so they intentionally “capture” and overrule any app usage. When you start a timer (or retroactively create a time entry), you tell Timing “I am working on ABC, regardless of what app usage is being tracked”.
If you would like to then re-assign parts of that time entry to a different project, you could click and drag on the timeline, then create a time entry in the selected time range, which will “split” the existing time entry if the option to replace existing time entries in this period was selected, or it will simply create a new time entry “parallel” to the existing one if this option was not selected, as outlined above.
There are also various other ways to manually create time entries as outlined above. In addition, the Entry-O-Matic can also be useful for creating entries from app usage.