Mac Trackpad Gestures: Swipe Your Way to a Smoother Work Experience
 Image created by ChatGPT
TL;DR: Mac Trackpad Gestures & Magic Mouse Gestures
Mac trackpad gestures let you navigate, multitask, and control your Mac with simple swipes, taps, and pinches. Key gestures include two-finger scrolling and right-clicking, pinch-to-zoom, four-finger swipe up for Mission Control, and four-finger swipe left/right to switch between Spaces. The Magic Mouse supports many of the same gestures on its touch-sensitive surface, including scrolling, swiping between pages, and accessing Mission Control. All gestures can be customized in System Settings > Trackpad (or System Settings > Mouse for Magic Mouse).
Are you using Mac trackpad gestures to the best of your ability? Besides navigation, there are more than a dozen built-in and custom multi-touch gestures that can make your workflow and browsing experience more intuitive, efficient, and personal.
A well-placed tap or swipe can instantly perform a task, saving you time from navigating menus, minimizing apps, and executing multi-step commands.
In this guide, you’ll find a comprehensive walkthrough of trackpad gestures for Mac, plus a complete list of Magic Mouse gestures. From basics to advanced tips, learn how to customize commands to fit your workflow.
Table of Contents
TOC
Mac Trackpad Gestures Cheat Sheet
Below is an overview table outlining the most widely used Mac trackpad gestures, organized from the basics to more advanced multi-finger commands.
Good to Know: All the gestures mentioned below also apply to the Magic Trackpad, Apple’s external Multi-Touch trackpad for iMac and Mac users. If you use a Magic Mouse instead, scroll down to our dedicated Magic Mouse Gestures section for a complete list of supported gestures.
| Gesture | Action |
|---|---|
| One-Finger Click / Tap | Select or click an item (tap to click can be enabled for lighter touch) |
| Double-Click / Double-Tap | Open files or apps (two quick clicks or taps) |
| Two-Finger Secondary Click | Contextual menu (right-click) by clicking or tapping with two fingers |
| Two-Finger Scroll | Scroll vertically or horizontally by sliding two fingers |
| Zoom in or out | Pinch with two fingers |
| Rotate | Twist two fingers around each other to rotate an image or element |
| Two-Finger Swipe Left/Right | Navigate back/forward by swiping with two fingers |
| Two-Finger Double-Tap | Smart-zoom into content |
| Three-Finger Drag | Drag windows or items by sliding three fingers (enable in Accessibility settings for an easier way to drag-and-drop) |
| Four-Finger Swipe Up | Open Mission Control (overview of all open windows & desktops) |
| Four-Finger Swipe Down | App Exposé – show all windows of the current app |
| Four-Finger Swipe Left/Right | Switch between full-screen apps or virtual desktops (Spaces) |
| Four-Finger Pinch | Open Launchpad (pinch thumb and three fingers together) |
| Four-Finger Spread | Show Desktop (spread thumb and three fingers apart to reveal the desktop) |
| Swipe from the Right Edge | Open Notification Center (two-finger swipe in from the trackpad’s right edge) |
| Force Click (Deep press) | Perform a lookup (dictionary) or a preview (Quick Look) by pressing firmly with one finger (on Force Touch trackpads) |
Basic Mac Trackpad Gestures
Click, Tap & Scroll
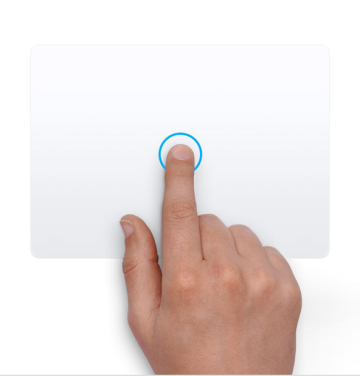
Image: Apple
Let’s begin with the basics: selecting, right-clicking, and navigating content. Together, these Mac trackpad gestures provide an efficient, low-friction way to interact with your macOS, from selecting files to browsing documents.
- Click: Pressing anywhere on the trackpad surface performs a standard click.
- Tap to Click: Enable this in System Settings to register a click with a light tap, for a faster and effortless interaction.
- Secondary Click: Tap with two fingers to open the context menu, replacing the need for a Control-click or external mouse.
- Scroll: Slide two fingers vertically to scroll through content, or horizontally to move across wide pages or spreadsheets. The gesture mirrors familiar touchscreen movements with precise control.
Pinch and Zoom
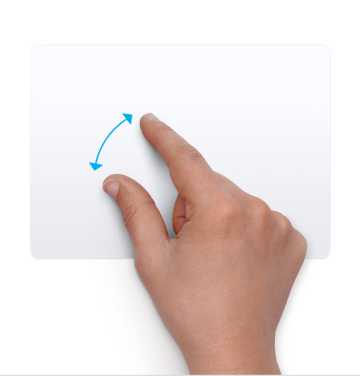
Image: Apple
Zooming on the Mac trackpad follows the same intuitive motion used on touchscreens. It provides a direct way to review documents, inspect images, or navigate maps in one fluid motion without buttons or menu controls.
- Pinch In: Move two fingers closer together to zoom out and view more of the page or image.
- Pinch Out: Spread two fingers apart to zoom in on details or increase text size.
This gesture is widely supported in apps like Photos, Safari, Maps, and Preview, offering quick control over visual content.
Smart Zoom
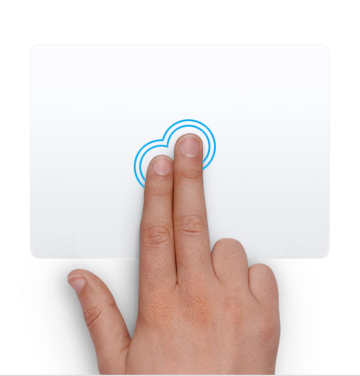
Image: Apple
Smart Zoom is a quick way to focus on a specific area without continuous pinching or manual zoom controls.
To activate: Double-tap with two fingers on a section of a webpage, PDF, or image to zoom in. Repeat the gesture to return to the original scale.
Use it when reading dense text, inspecting images, or reviewing detailed documents, and you want to concentrate on the content without interrupting your flow.
Basic Navigation & Selection
Navigation on the Mac starts with a simple, one-finger glide. From moving the pointer to selecting and rearranging content, the Mac trackpad gesture forms the foundation of how you interact with your macOS.
- Move the Pointer: Slide one finger across the trackpad to control the cursor and interact with interface elements.
- Click-and-Drag: Press down on an item and drag with one finger to reposition it.
- Three-Finger Drag: Enable this in System Settings for a lighter, more ergonomic option. Move files or windows by sliding three fingers across the trackpad. Tap to release.
How to Navigate macOS with Trackpad Gestures
Swipe Between Pages
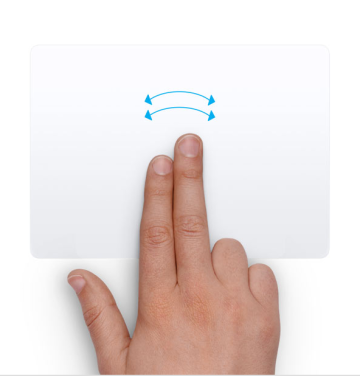
Image: Apple
Navigating content becomes faster and more natural with the swipe between pages gesture. It replaces the need for back and forward buttons, creating a smoother reading or browsing experience.
- Swipe Left: Use two fingers to swipe left and return to the previous page.
- Swipe Right: Swipe right with two fingers to move forward.
The gesture works in Safari, Chrome, Finder, Preview, and many other multi-page apps, mirroring how you flip through a book or scroll through content on a phone.
Scroll in All Directions
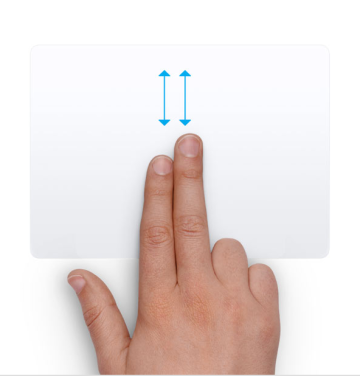
Image: Apple
Two-finger scrolling on the Mac trackpad provides precise control over both vertical and horizontal movement. It makes navigation through broad or dense content seamless and eliminates the need to drag scrollbars or use arrow keys.
- Vertical Scroll: Slide two fingers up or down to move through long documents, webpages, or lists.
- Horizontal Scroll: Slide two fingers left or right to navigate across spreadsheets, wide-format documents, or galleries.
By default, macOS scrolls in the same direction as your fingers—up to move upward, down to move downward. However, you can adjust this to your preference in System Settings.
Open Notification Center
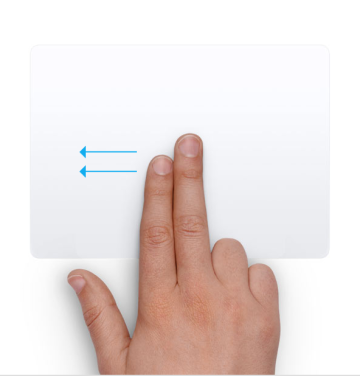
Image: Apple
Swiping in from the edge of the macOS trackpad enables quick access to Notification Center without breaking your focus. With a simple motion, you can check notifications, reminders, calendar items, and customizable widgets such as weather, stocks, or Apple Music.
- To open: Swipe left with two fingers, starting from the right edge of the trackpad.
- To dismiss: Swipe right with two fingers to close the panel.
Mission Control & Window Management
Mission Control (Bird’s-eye View)
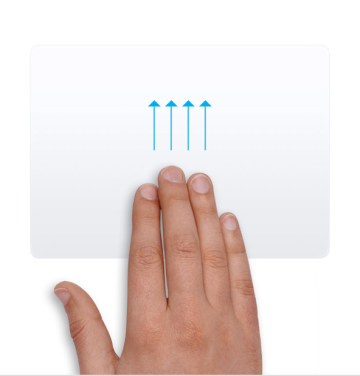
Image: Apple
Mission Control provides a high-level overview of your workspace, making it easy to manage multiple apps, windows, and desktops.
To activate: Swipe up with four fingers. The number of fingers used can be customized in System Settings, allowing you to adjust the gesture to three fingers if preferred.
You’ll see all open windows, full-screen apps, and Spaces arranged in a clear, organized view. Click on any window to bring it to the front. It’s an ideal Mac trackpad gesture for complex workflows involving multiple documents, browsers, or apps.
To organize your windows, drag each one into different Spaces from Mission Control. It helps you organize by task or project and easily switch focus without needing to cycle through apps.
App Exposé (App Windows)
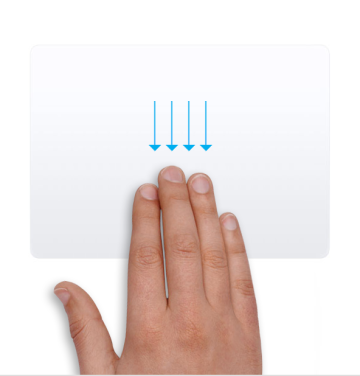
Image: Apple
App Exposé narrows your view to the active application, making it easier to locate, compare, or switch between open windows without distraction.
To activate: Swipe down with four fingers. Gesture configuration can be adjusted in System Settings, allowing you to use three- or four-finger input based on your preferences and macOS version.
You’ll see only the windows associated with the current app. Everything else is hidden from view, reducing visual clutter and speeding up the process of switching between open files or tabs within a single tool.
Show Desktop
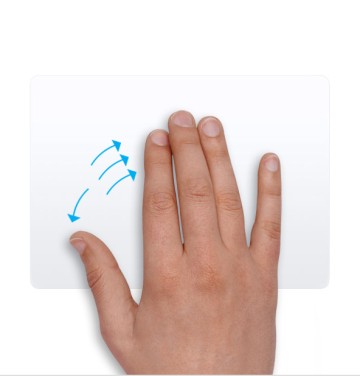
Image: Apple
Spreading your thumb and three fingers apart shifts all open windows aside, revealing the Desktop. It’s a subtle yet effective way to access files or folders hidden beneath active applications, without needing to manually minimize or move anything.
Use it to:
- Drag a file into an email
- Open a document from your Desktop
- Reset your workspace
To restore your windows, pinch the same four fingers together or select any open app. When combined with Mission Control and App Exposé, Show Desktop completes a set of spatial navigation tools, giving you more control and speed over your workflow.
Launchpad
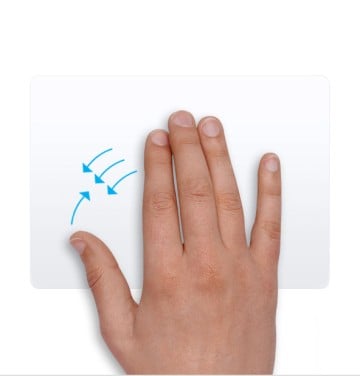
Image: Apple
Pinching your thumb and three fingers together on the trackpad opens Launchpad, macOS’s app grid interface. The trackpad gesture brings your entire app library into view, without needing to navigate through the Finder or Dock.
Swiping left or right with two fingers navigates between pages, while typing immediately filters results by name. Although not a primary workflow tool for every user, Launchpad remains a useful option for users who appreciate structured visual access to their app library.
App Switching & Multitasking
Swipe Between Full-Screen Apps & Desktops
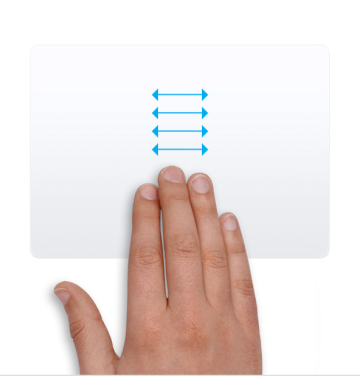
Image: Apple
By default, swiping left or right with four fingers allows you to move between full-screen apps and virtual desktops, called Spaces, in macOS. Each Space acts as a dedicated environment, whether it’s a single app in full-screen mode or a desktop arranged for a specific task.
The Mac trackpad gesture supports a modular approach to multitasking, allowing you to group related tools and switch between them without visual clutter or distraction.
For example, keep your browser in one Space, a time tracking app in another, and a call window in a third. Swiping between them maintains your flow and keeps each task visually distinct.
If you want to change the number of fingers used for the gesture, go to System Settings > Trackpad > More Gestures > Swipe between full-screen apps, and choose between three or four fingers from the dropdown.
Three-Finger Drag for App Windows
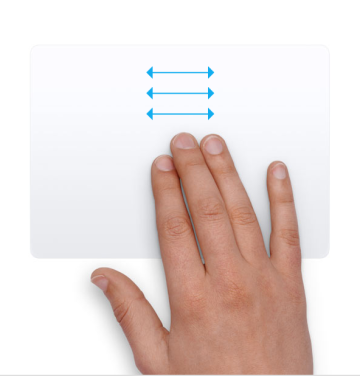
Image: Apple
Dragging windows becomes more fluid when using the three-finger drag. Instead of clicking and holding the title bar, the Mac gesture allows you to reposition windows by sliding three fingers across the trackpad.
It reduces strain during frequent repositioning and allows for smoother control when managing multiple windows or organizing your workspace.
For example, you can quickly reposition a messaging app or move a video call to a separate Space.
Bonus: Hot Corners & Stage Manager
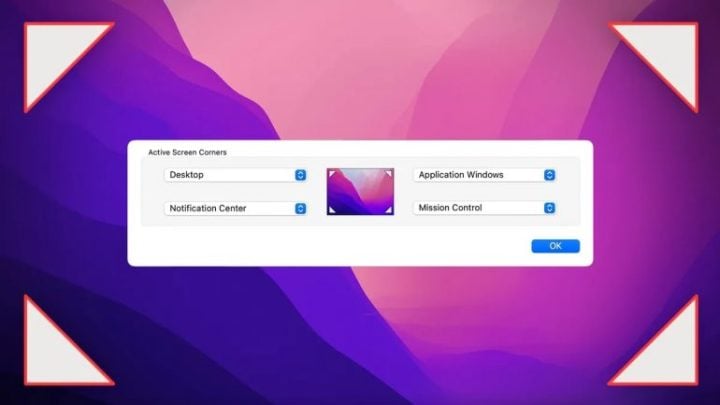
Image: Cnet
macOS includes additional tools that complement gesture-based navigation and support a more structured multitasking workflow.
Hot Corners allows you to assign specific actions, like showing the Desktop or opening Mission Control, to any screen corner. Moving the cursor into a corner, with a smooth trackpad glide, instantly triggers the assigned function.
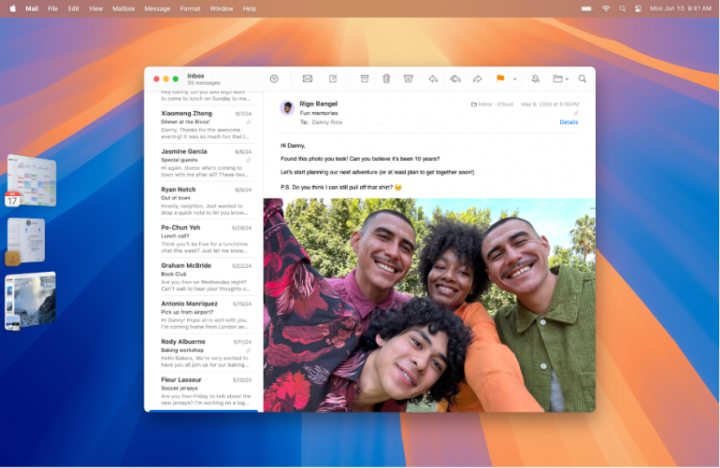
Image: Apple
Stage Manager, introduced in macOS Ventura, creates a structured workspace by keeping the active window centered and displaying other open apps in a side panel.
- Activate Stage Manager through Control Center.
- Once enabled, you can navigate entirely with gestures. Swipe to switch windows, select apps from the side, or reorganize your workspace without needing clicks or menus.
- Stage Manager is handy for maintaining focus while keeping other tools close at hand.
Together, Hot Corners and Stage Manager create workflow anchors to your trackpad, minimizing interruption and maximizing fluid control.
Trackpad Gestures for Safari, Preview, Photos, and Other Apps
Rotate Media
Image: Apple
Rotating images or documents becomes intuitive with the two-finger rotate gesture. Placing two fingers on the Mac trackpad and turning them, like rotating a physical object, creates a tactile way to adjust visual content.
In apps like Preview, Photos, and Keynote, the trackpad gesture allows for incremental or smooth rotation, removing the need to locate menu commands or toolbar buttons.
While not all applications support rotation, those that do make full use of the trackpad’s ability to translate natural gestures into precise actions.
Look Up (Dictionary & Data Detectors)
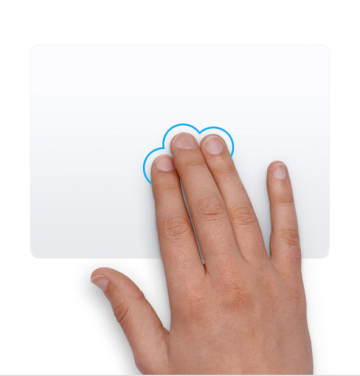
Image: Apple
The Look Up gives you instant access to definitions, references, and contextual tools without interrupting your flow. By interacting directly with text or data on screen, macOS can surface relevant information using built-in data detectors.
Tapping on a word may reveal a dictionary definition or a concise Wikipedia entry. At the same time, dates, addresses, and flight numbers can trigger suggestions to create calendar events, open Maps, or show related details.
On older Mac trackpads, you can activate the gesture with a three-finger tap, while newer Force Touch models use a firm single-finger press.
How to Customize Mac Trackpad Gestures
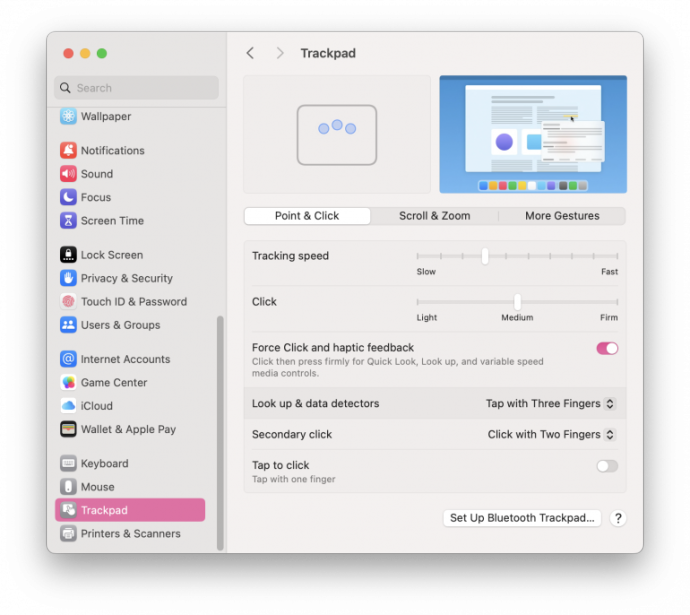
Customize Your Trackpad in System Settings
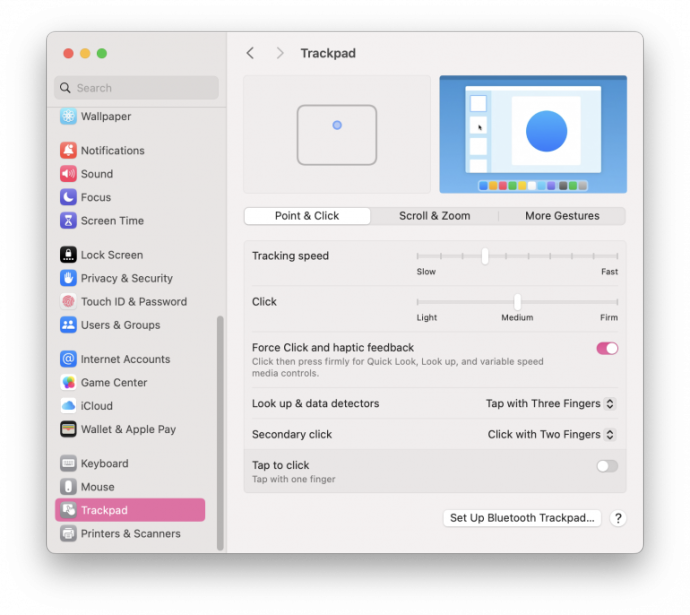
Want to customize your macOS trackpad gestures to your workflow? Navigate to Apple Menu > System Settings > Trackpad. The settings are grouped into clear categories such as Point & Click, Scroll & Zoom, and More Gestures, each one giving you the ability to fine-tune how the trackpad responds to input.
- Under Point & Click: Enable Tap to Click, adjust Secondary Click behavior, and configure Look Up & Data Detectors. You can also set your tracking speed, which determines how quickly the pointer moves in response to your hand.
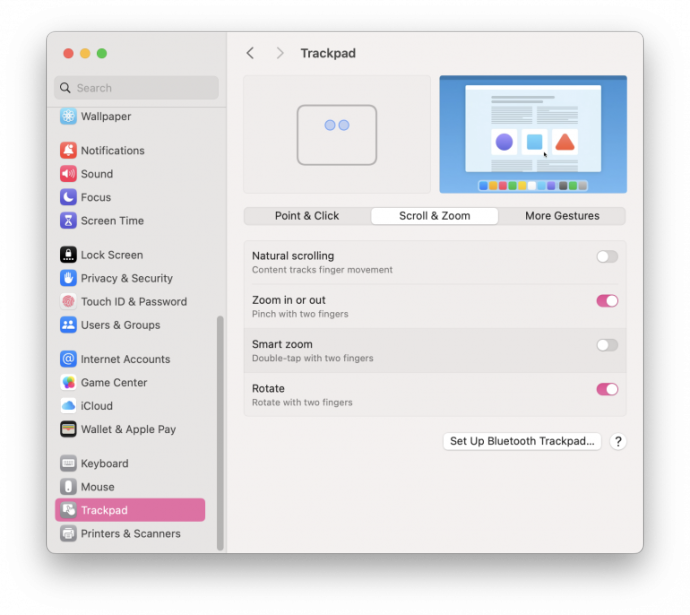
- Scroll & Zoom: Invert scrolling direction, toggle zoom and rotate gestures, and refine how scrolling behaves system-wide.
- More Gestures: Here you’ll find settings for workspace navigation, including Swipe Between Pages, Swipe Between Full-Screen Apps, Mission Control, App Exposé, Launchpad, and Show Desktop. Most gestures include visual previews and drop-down menus for selecting the number of fingers required.
Taking time to explore and adjust these settings creates a more deliberate and responsive interaction with macOS, where the trackpad becomes an extension of how you think and work. For more ways to personalize your Mac, see our guide to 17 cool Mac System Settings.
Enable Three-Finger Drag
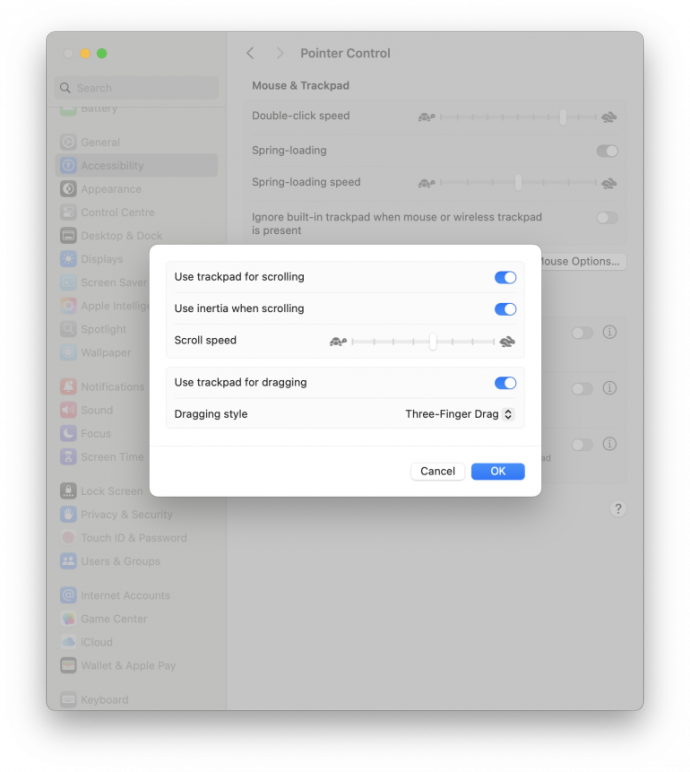
As mentioned earlier, the three-finger drag is one of the best trackpad customisations.
To enable: Go to System Settings > Accessibility > Pointer Control > Trackpad Options. Select Enable Dragging, then choose Three Finger Drag from the dropdown menu.
The gesture supports a more ergonomic approach to navigation, easing the physical strain that can come from repeated click-and-drag motions during long working sessions. It’s a small change with a noticeable impact on comfort and usability.
More broadly, this kind of customization reflects macOS’s design philosophy: adaptable tools that accommodate different preferences, workflows, and working styles.
Adjusting Gesture Sensitivity
Fine-tuning how your trackpad responds to input improves both precision and ease of use throughout your daily workflow.
- Tracking Speed: Found under System Settings > Trackpad, this slider adjusts how quickly the pointer moves in response to finger movement. A higher setting covers more screen space with less effort; a lower setting offers finer control.
- Force Touch Options: On devices with a Force Touch trackpad, you can adjust the pressure required to register a click (light, medium, or firm) and customize what a Force click does (e.g., Look Up or content previews).
These minor adjustments can influence how intuitive and responsive your macOS trackpad gestures feel.
Third-Party Tools for Custom Gestures
For those who want deeper control over how their Mac responds to input, third-party tools offer advanced options beyond the built-in gesture system.
- BetterTouchTool: Allows complete customization of trackpad, mouse and keyboard. You can create your custom gesture, like a three-finger tap to play or pause music, or a four-finger swipe down to snap a window to the lower half of the screen. You can even restrict gestures to certain areas of the screen, for example, swiping two fingers over the Dock to switch between apps. It also supports app-specific gestures, such as triggering a particular tool in Photoshop with a three-finger pinch.
- Swish: Another gesture-based tool, focused on window management. It enables directional swipes to snap windows into halves, quadrants, or full-screen layouts.
When using third-party tools, it’s essential to avoid conflicts with macOS’s native gestures. A well-designed setup complements the operating system and enhances functionality without introducing friction.
For more ways to elevate your computing experience, see our article: The 12 Best Apps Mac Power Users Leverage to Supercharge Their Productivity
Turn Off Unwanted Gestures
macOS provides the option to turn off gestures that don’t align with your workflow or that are frequently triggered by accident. Navigate to System Settings > Trackpad to manage each individual gesture.
For example, gestures like Rotate or Swipe Between Pages may interfere with scrolling or precision work in creative applications. Disabling them can help maintain smoother control.
Advanced Tips & Hidden Trackpad Gestures
 Image generated by ChatGPT
Force Click for Extra Functions
The Force Touch trackpad, available on most MacBooks since 2015 and on the Magic Trackpad 2, adds pressure sensitivity to standard input. By pressing firmly, you activate the Force click gesture, which triggers additional functions across macOS.
For example, a firm click on a file icon reveals a Quick Look preview, while doing the same on a word brings up a dictionary definition or Wikipedia entry. Pressing on a date, address, or link can open a quick view in Calendar, Maps, or Safari, depending on context.
You can adjust the pressure sensitivity or turn off Force Click entirely in System Settings > Trackpad.
Three-Finger Drag & Drop Techniques
Once enabled, Three-Finger Drag can do more than window movement. It supports advanced, gesture-driven workflows for content transfer and multitasking. Such as:
- App Switching While Dragging: Begin dragging a file with three fingers, then press Command+Tab with your other hand to switch to another application. Once the destination app is active, complete the drag-and-drop action.
- Using Mission Control While Dragging: Drag the item toward the edge of the screen and pause briefly. Mission Control will activate automatically, allowing you to drop the item into a different desktop Space or application window.
Both techniques offer a smooth, hands-on alternative to copy and paste or multi-step window navigation.
Hidden Trackpad Features in Apps
In addition to system-wide gestures, many macOS applications support trackpad interactions that are specific to their interfaces. These gestures are often undocumented, yet offer meaningful shortcuts to improve navigation and streamline routine tasks.
Safari
- A two-finger pinch enters tab overview, allowing for quick scanning and selection of open tabs.
- Mirrors tab gestures found in iPadOS
- Helpful in managing multiple pages without reaching for the toolbar
Preview
- Combines pinch and rotate gestures for intuitive document handling
- Pinch to zoom in and out of images or PDFs
- Rotate scanned documents using a two-finger twist
- Particularly helpful when reviewing diagrams or correcting document orientation
Photos
- Pinch to zoom
- Swipe left or right with two fingers to move between images
- Mimics the feel of browsing through a digital photo album
Sketch
- Two-finger swipe pans across the canvas
- Pinch adjusts the zoom level dynamically
- Replaces scrollbars and sliders for a more fluid, creative workflow
Recognizing and adopting these hidden features adds another layer of control to your toolkit, one shaped by the tools you use most often.
Magic Mouse Gestures: Every Gesture You Can Use
The Apple Magic Mouse packs a surprising number of gesture-based controls into its touch-sensitive surface. While Magic Mouse gestures are fewer in number than trackpad gestures, the ones available cover the essentials for navigation, multitasking, and window management. Here is a complete list of gestures supported on the Magic Mouse:
Basic Clicks
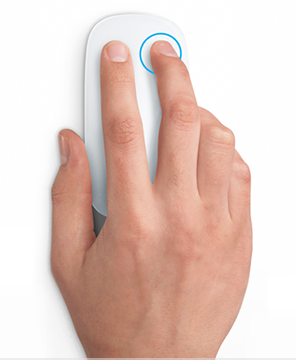
Image: Apple
The Magic Mouse’s entire surface acts as a button.
- Left-click by pressing down normally.
- Right-click (also called a secondary click) brings up a context menu, exactly like a right-click on a traditional mouse.
Because the Magic Mouse uses touch sensitivity to detect clicks, it’s important not to rest multiple fingers on the surface during a click, or it may register the wrong input.
Scrolling
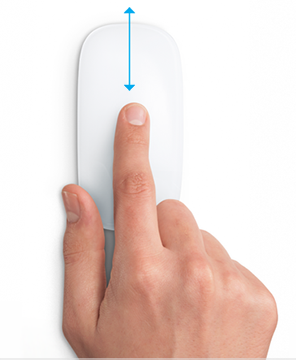
Image: Apple
Slide one finger up, down, or sideways on the Magic Mouse to scroll through content.
Swiping Between Pages
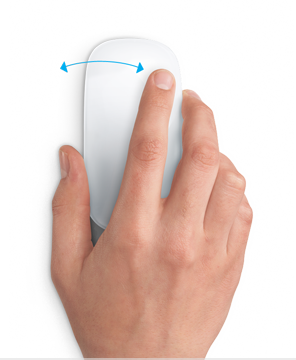
Image: Apple
Place one finger lightly on the surface and swipe left or right to navigate back and forward in apps like Safari or Finder.
Double-Tap for Mission Control
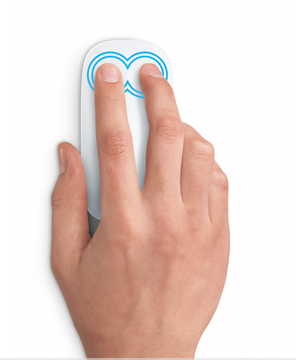
Image: Apple
A two-finger double-tap on the Magic Mouse can open Mission Control. This replicates the trackpad’s four-finger swipe up for a birds-eye view of open windows.
Swipe Between Full-Screen Apps
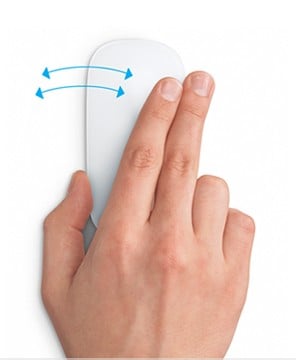
Image: Apple
Swipe left or right with two fingers on the mouse surface to move between full-screen apps or virtual desktops (Spaces). The Magic Mouse automatically determines whether to perform a back or forward swipe or switch Spaces based on app context.
Customizing Magic Mouse Gestures
To customize your Magic Mouse gestures, go to System Settings > Mouse. From there, you can adjust tracking speed, scrolling direction, secondary click behavior, and enable or disable gestures like Smart Zoom, swiping between pages, and Mission Control. If you want more advanced gesture control beyond what Apple provides, tools like BetterTouchTool can extend the Magic Mouse with custom gestures similar to those available on the trackpad.
How Mac Gestures Save Time (and How Timing Helps Measure It)
Mac trackpad gestures reduce both effort and delay. A swipe to switch apps, a tap to open a menu, or a pinch to zoom replaces multi-step sequences with direct, fluid motion.
Each gesture may only save a second or two, but over time, those seconds add up. For example, one study we cited in our keyboard shortcuts guide found that people waste 2 seconds per minute switching between a mouse and a keyboard, which accounts for 3% of the workday. Choosing one primary input method, whether trackpad or Magic Mouse, and minimizing constant switching between them can help maintain focus, reduce friction, and support a more productive day.
Here’s how those time savings play out in practice:
- Faster task execution
- Switch between windows or desktops instantly.
- Reveal the Desktop or open Mission Control with a single motion.
- Improved focus
- Fewer interruptions from navigation tasks.
- Less cognitive effort on interface management.
- Reduced physical strain
- Swiping replaces scroll wheel rotations.
- Tapping replaces more forceful clicks or keyboard combinations.
To understand the impact gestures have on your workflow, a tool like Timing can provide objective insight. Timing automatically tracks app usage, focus sessions, and context switching.
While Timing doesn’t log gestures directly, it reflects their effect. If your workflow becomes smoother, the data will show it. And if something continues to interrupt your focus, Timing helps you identify and adjust.
Together, they create a feedback loop: gestures improve the way you work, and Timing helps you measure and build on those gains.
Start Saving Time with Mac Trackpad Gestures and Magic Mouse Gestures
Mac trackpad gestures streamline how you work. Each one reduces friction, cuts down on context switching, and keeps your attention on what matters.
Paired with Timing, you can feel the difference and see it. You gain a clear view of how your time is spent and where your workflow is improving or slowing down. A few seconds saved here and there mean finishing a task faster, freeing up billable hours, or simply having space to take a break.
Ready to become a more efficient Mac user? Download Timing’s free 30-day trial and gain more clarity, control, and intent over your time.
Frequently Asked Questions: Mac Trackpad Gestures
How Do I Right-Click on a Mac Trackpad?
To right-click (secondary click) on a Mac trackpad, tap or click with two fingers anywhere on the trackpad surface. This opens the context menu, just like right-clicking on a traditional mouse. You can customize this behavior in System Settings > Trackpad > Point & Click.
How Do I Enable Three-Finger Drag on Mac?
To enable three-finger drag, go to System Settings > Accessibility > Pointer Control > Trackpad Options. Select “Enable Dragging” and choose “Three Finger Drag” from the dropdown menu. This allows you to drag windows and files by sliding three fingers across the trackpad without clicking.
What Is Force Click on a Mac Trackpad?
Force Click is a pressure-sensitive gesture available on Force Touch trackpads (most MacBooks since 2015 and Magic Trackpad 2). Press firmly with one finger to trigger additional functions like Quick Look previews, dictionary lookups, and data detectors for dates, addresses, and links.
Can I Customize Mac Trackpad Gestures?
Yes, Mac trackpad gestures are highly customizable. Go to System Settings > Trackpad to adjust settings for Point & Click, Scroll & Zoom, and More Gestures. You can enable Tap to Click, change the number of fingers for specific gestures, adjust tracking speed, and turn off gestures you don’t use.
Do Mac Trackpad Gestures Work on Magic Trackpad?
Yes, all Mac trackpad gestures work on the Magic Trackpad, Apple’s external Multi-Touch trackpad for iMac and Mac desktop users. The Magic Trackpad 2 and later also supports Force Touch gestures like Force Click for lookups and previews.
What Gestures Does the Magic Mouse Support?
The Magic Mouse supports scrolling (one-finger slide in any direction), swiping between pages (one-finger swipe left/right), opening Mission Control (two-finger double-tap), and swiping between full-screen apps or Spaces (two-finger swipe left/right). You can also enable Smart Zoom (one-finger double-tap) and customize secondary click behavior in System Settings > Mouse.
Magic Mouse vs. Trackpad: Which Has Better Gesture Support?
The Mac trackpad supports more gestures than the Magic Mouse, including pinch-to-zoom, rotate, four-finger swipes for Mission Control and App Expose, Launchpad, and Show Desktop. The Magic Mouse covers the basics well — scrolling, swiping, and Mission Control — but if gesture-driven navigation is important to your workflow, the trackpad or Magic Trackpad offers a wider range of options.