How to Use Keyboard Shortcuts on Mac: The Complete Guide

Knowing how to use keyboard shortcuts on Mac is one of the simplest ways to work faster and stay focused. Instead of constantly reaching for your mouse or trackpad, you can copy, paste, switch apps, take screenshots, and navigate text — all without lifting your fingers from the keyboard. Whether you are new to macOS or switching from Windows, learning Mac keyboard shortcuts will streamline your workflow and help you accomplish tasks more efficiently. And when combined with the right productivity tools, like those highlighted in our guide to the best productivity apps for Mac, you can take your efficiency to the next level.
According to this study, people waste an average of 2 seconds per minute by switching between mouse and keyboard — that’s 3% of your workday! Learning just one keyboard shortcut could save you several hours each year. And for those who work on a computer for eight hours per day, keyboard shortcuts can save up to 8 workdays per year. Not to mention the fact that using keyboard shortcuts can also make you happier, because you are less likely to be interrupted by having to navigate menus and can thus stay in a “flow” state for longer — similar to the Flowtime Technique — which is known to be beneficial to work satisfaction.
In this article, we’ll explore some essential Mac keyboard shortcuts and provide tips on how to discover and remember them to boost your productivity, to help you be more efficient, productive and happy at work!
TL;DR: Essential Mac Keyboard Shortcuts
- Core shortcuts: ⌘C (copy), ⌘V (paste), ⌘Z (undo), ⌘S (save), ⌘Q (quit)
- Modifier keys: Command (⌘), Option/Alt (⌥), Control (⌃), Shift (⇧)
- Screenshots: ⇧⌘3 (full screen), ⇧⌘4 (selection), ⇧⌘5 (toolbar)
- App switching: ⌘Tab (switch apps), ⌘` (switch windows of same app)
- Force quit: ⌥⌘Esc opens Force Quit window (Mac’s Ctrl-Alt-Delete)
- Discovery tip: Check any app’s menus to see shortcuts listed beside commands
Table of Contents
TOC
What Are Mac Keyboard Shortcuts and Why Should You Use Them?
Mac keyboard shortcuts are key combinations that let you perform actions quickly without using your mouse or trackpad. By pressing modifier keys (Command, Option, Control, or Shift) together with other keys, you can copy text, take screenshots, switch apps, navigate documents, and execute hundreds of other commands instantly. These shortcuts work across macOS on MacBooks, iMacs, Mac Minis, and Mac Studios.
Learning how to use keyboard shortcuts on a Mac is worth the effort. Once you build muscle memory, actions that used to take several clicks happen in a split second — and you stay in deep focus instead of hunting through menus.
The Basics: Standard Mac Keyboard Shortcuts
Almost every Mac app includes a standard set of keyboard shortcuts. Learning some of these is a great boost to your productivity because you only have to learn them once, then you can apply them to all apps. To demonstrate these, open TextEdit and create a new document.
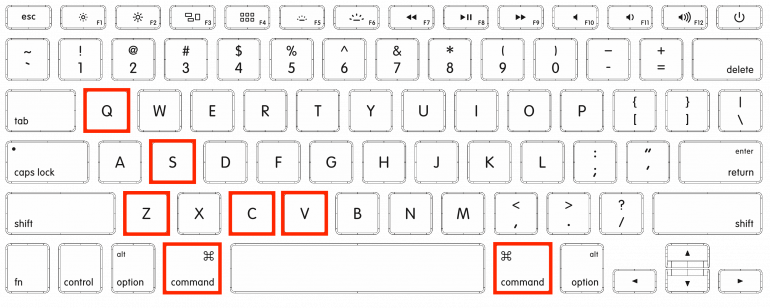
Press the S key on your keyboard – the letter “s” appears in the text. You can change what happens when you press the S key by adding a modifier like the Shift (⇧) key. It still adds a letter to your text, but it “shifts” it to an uppercase “S”.
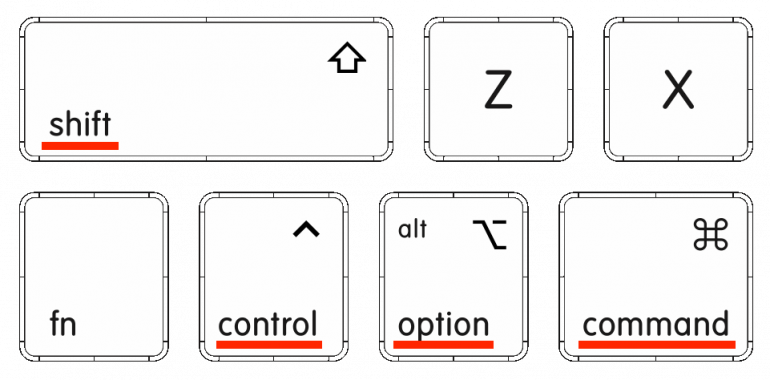
There are three other modifier keys for you to learn: Command (⌘), Option (⌥) (sometimes also called the “Alt” key on Windows PC keyboards), and Control (⌃). Depending on your keyboard, you may have more than one of some of these, so use whichever is most comfortable for you.
The modifier that’s most frequently used to perform an action is Command (⌘). This is the one directly on either side of the space bar in a standard Apple keyboard and it has a squarish symbol with circles at each corner.
There’s a set of keyboard shortcuts that are shared by almost every app. I’m not going to flood you with a giant list here, but check out the ones I use the most:
- ⌘C: Copy
- ⌘V: Paste
- ⌘Z: Undo
- ⌘S: Save
- ⌘W: Close the current window
- ⌘Q: Quit
Test each of these in your TextEdit document. Type some text, copy and paste it, undo the paste, save your document and then quit the app.
So how can you remember these? They all use a single modifier – the Command (⌘) key. While holding it down, you press a letter. Some of these make sense – C for copy, S for save, Q for quit. The others you just have to learn. The paste key (V) is right beside the copy key (C), so that might help.
If you are completely new to using keyboard shortcuts, start by learning to use these five. You’ll need time to get used to them, but you’ll soon start to see a good increase in your productivity.
Discovering Mac Keyboard Shortcuts
So far, I’ve talked about a few Mac keyboard shortcuts that are common to almost every app, but what about all the others? Every app has their own custom keyboard shortcuts and some apps will have different functions for the same keyboard shortcut. Learning how to discover and remember these is a “key” task for your Mac workflow.
The best way to discover keyboard shortcuts in a Mac app is to look at the app’s menus which show the commands and their associated keys and modifiers. The first trick is to decipher the Mac keyboard shortcuts symbols shown beside the menu commands. Recent Mac keyboards show these symbols on the keys, but you may be using a different keyboard, so you need to be able to read these.
Open Safari and look at the File menu. Not all the items will be enabled, but the items shown cover all the main modifiers and their keyboard symbols.
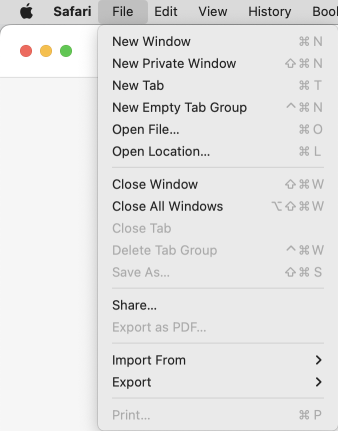
Starting at the top, New Window uses ⌘N. The square with circles at each corner is Command (⌘) and N is almost always New something.
Next down is New Private Window which uses ⇧⌘N. The Shift (⇧) modifier is a fat upwards arrow. It’s “shifting” the key upwards, and provides a variation to ⌘N.
This illustrates an important point about Mac keyboard shortcuts. They appear to use an uppercase letter e.g. “N” but this is for display. Really, you use the lowercase letter and only add the Shift modifier if it is requested, like for New Private Window.
Skipping the next item, look at New Empty Tab Group. It has two modifiers which translate to Control-Command (⌃⌘).
Finally, check out Close All Windows. This uses three modifiers. You’ve already looked at Shift and Command. The other one is Option (⌥). We didn’t find a definitive source on why this symbol looks the way it does; some people claim that it is based on a symbol used in electrical engineering to represent a switch. However, we like to think of it as being similar to a railway switch, representing an alternative “path” (or option) you could take.
By the way, if you are searching for a specific command to look up the shortcut for, try clicking the app’s “Help” menu. That menu has a text field where you can enter the command’s name. Once you start typing, the menu will show you the commands that match your search, and if you hover any of these commands with your mouse, it will show you both where you can find the command and which keyboard shortcut the command has.
Pro Tip: How to Remember Keyboard Shortcuts
Every app has a collection of keyboard shortcuts, some have a lot! Often, there are cheat sheets that list them, but the best way to learn is by using them.
If you find yourself using a menu item three times in a day, stop and work out the shortcut. Then don’t use the menu – use the shortcut you just learned.
Next time, you may have to read the menu again, but use the shortcut to perform the action. It will take time, but your fingers will remember what to do if you keep doing it.
And this way of learning means that your efforts are directed towards learning the menu items that you use.
Adding Custom Keyboard Shortcuts to Your Mac
What if you frequently use a command that has a menu item but no keyboard shortcut? For example, I like using Preview to resize images. In the Tools menu, Preview has Adjust Size… which does what I want, but there’s no keyboard equivalent.
No worries – System Settings lets you add your own keyboard shortcuts to your Mac.
Open System Settings and scroll down the sidebar to find Keyboard. Select it, then click the Keyboard Shortcuts… button and select App Shortcuts in the sidebar. This is an app-specific shortcut, so use the + to open a new dialog.
Select Preview from the Application popup and then type in the menu title. This needs to be exactly as it appears in your app, in your language. If you need to type an ellipsis (the three dots symbol) use ⌥; (another shortcut for your collection).
There is an almost invisible edit field on the Keyboard Shortcut line, so click there and press the keys to record your custom shortcut. I chose ⌥⌘S.
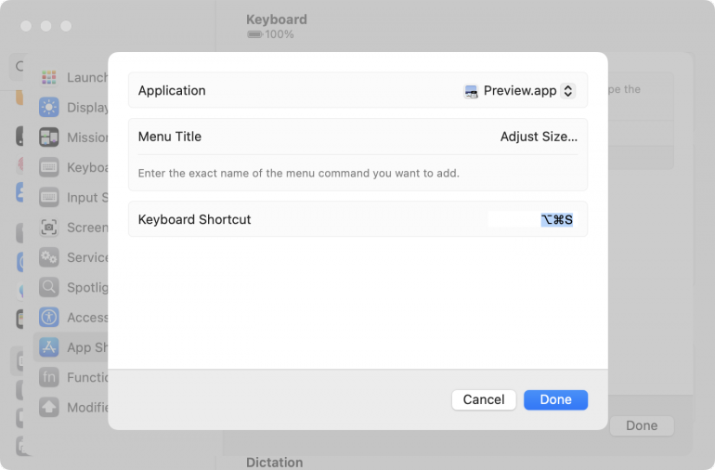
Click Done and then open an image in Preview. Check out the Tools menu to see your new shortcut. Close the menu and try out the keys. It works!
If you are on an earlier version of macOS, you’ll do this in System Preferences. It looks a bit different but the technique is the same. For everything you need to know about navigating System Settings, check out our guide on 17 of the best System Settings on Mac.
Mac System Keyboard Shortcuts
So far, we’ve looked at app-based shortcuts, but in our daily work, we jump between apps, open and close windows, search, adjust settings and so on. These can be done in a variety of ways, but learning the Mac keyboard shortcuts for navigation is a great time saver.
One of the most important Mac system keyboard shortcuts is ⌘-Space to open Spotlight. This is an efficient way to open apps, find files, search the web and even do calculations and conversions.
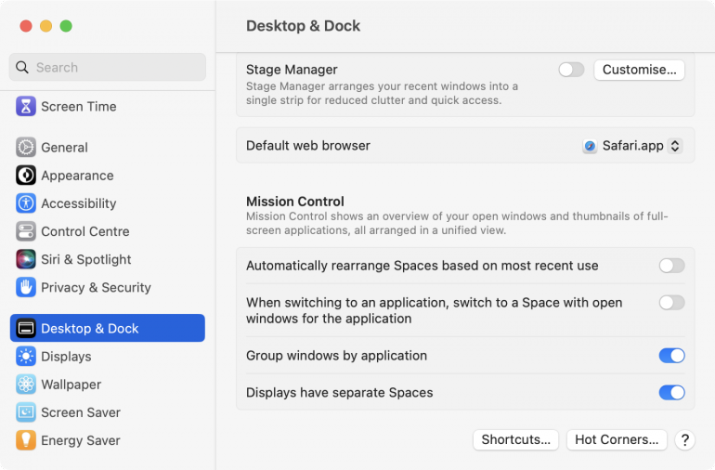
macOS has a great feature called Mission Control. You’ll find the controls for it in System Settings under Desktop & Dock, if you scroll to the end. Mission Control uses Spaces to give you virtual desktops, and it can show you all the open windows for the frontmost app.
The default shortcuts for Mission Control all use the Control key with arrows. Click the Shortcuts… button to see them all.
⌃-Up arrow shows the Spaces at the top of the screen. You can use the + to add a new one, and you can drag windows from your current space into a different space.
Once you have multiple Spaces, use ⌃-Left arrow and ⌃-Right arrow to move between them.
And if you have more than one window open on an app, ⌃-Down arrow is great for showing them all in a way that makes it easy to swap between them.
Remember, you’re controlling your system with these keyboard shortcuts.
Mac Keyboard Shortcuts for Switching Apps and Managing Windows
Jumping between open apps is something every Mac user does dozens of times a day. These shortcuts keep you in the flow:
- ⌘Tab: Switch to the next open app. Keep holding ⌘ and press Tab repeatedly to cycle through them.
- ⌘` (backtick): Switch between windows of the same app — for example, toggling between two Safari windows.
- ⌘H: Hide the current app. Add ⌥ to hide all other apps.
- ⌘M: Minimize the current window to the Dock.
- ⌃⌘F: Toggle the current window into full screen.
If you frequently work in Finder, a few extra shortcuts are worth memorizing:
- ⌘N: Open a new Finder window.
- ⇧⌘N: Create a new folder.
- ⌘Delete: Move the selected file to the Trash.
- Space: Quick Look — preview any file without opening it.
- ⌘I: Open the Get Info panel for the selected file.
Mastering these shortcuts means fewer trips to the Dock and the menu bar, which adds up to meaningful time savings across your workday. For more ways to speed up repetitive tasks, see our guide on Mac automation.
Force Quit Applications: The Mac’s Ctrl-Alt-Delete
If you’re coming from Windows, you might be wondering about the Mac equivalent of the famous Ctrl-Alt-Delete shortcut. On Mac, that’s ⌥⌘Esc (Option-Command-Escape). This keyboard shortcut opens the Force Quit Applications window, which shows all your running apps and lets you force quit any that have become unresponsive.
Unlike Windows Task Manager, the Force Quit window is streamlined and focused on one task – ending frozen applications. Simply select the troublesome app from the list and click Force Quit. It’s a lifesaver when an app stops responding and the regular ⌘Q quit command isn’t working.
Here’s a pro tip: if you know which app is frozen and it’s currently in focus, you can skip the Force Quit window entirely. Hold down ⇧⌥⌘Esc (add Shift to the mix) for three seconds, and macOS will force quit the current app immediately. No dialog, no fuss – just a quick recovery from a frozen app so you can get back to being productive.
For more detailed system monitoring similar to Windows Task Manager, Mac has Activity Monitor. The quickest way to launch it? Use ⌘-Space to open Spotlight (remember that shortcut from earlier?) and type “Activity” – it usually appears after just a few letters. Hit Return and you’ll have access to detailed information about CPU usage, memory, energy, disk, and network activity. While Force Quit is your quick fix for frozen apps, Activity Monitor is your diagnostic tool for understanding what’s happening under the hood.
Mac Keyboard Shortcuts for Taking Screenshots
One more category of Mac system controls is for taking screenshots. These can be very useful, but unlike in apps, their shortcuts are not easily discoverable.
The basic shortcut for grabbing the entire screen is ⇧⌘3. If you want to copy the image instead of saving it as a file, add in the Control key.
Getting an image of part of the screen uses ⇧⌘4. This gives you a crosshair that you can drag over the relevant area, and you can press Escape to cancel. Again, add in the Control key to copy the result instead of saving it.
When the crosshairs are visible, you can do more…
- Once you have started the drag to select a region, hold down Space to move the origin corner instead of the cursor corner.
- Before you start dragging, press Space and mouse over a window to highlight it. Click to grab just that window. If that window is showing a dialog and you only want the dialog, hold down Command (⌘) before clicking.
- By default, a window snapshot includes a drop shadow. Hold down Option (⌥) before clicking to remove the shadow.
And finally, you can use ⇧⌘5 to show the screenshot toolbar. This lets you set various options, add a timer and start a screen recording, as well as capturing various screenshots.

Text Navigation with the Mac Keyboard
There’s one final aspect of using the keyboard that I want to cover and that’s text navigation. How often do you reach for the mouse or trackpad to move the cursor or to select text? How about keeping your fingers on the keys and using arrows and modifiers instead? Again, the fewer times you have to take your hands off the keyboard, the more productive you’ll be.
The arrow keys on their own move the text editing cursor by one step. Up-arrow goes up one line, right-arrow moves right one character and so on.
Add in the Option (⌥) key to move left or right by word, or up and down by paragraph.
Switch to the Command (⌘) modifier to move to the start or end of the line or the document.
Now for the fun part – add Shift (⇧) to any of these moves to select from the current cursor position to the destination. For example, ⇧⌥-Left arrow selects from the cursor to the start of the previous word (or the current word if your cursor is inside a word). Keep holding the modifiers and press the arrow key again to extend the selection.
Like all keyboard shortcuts, this needs practice. Remember that an arrow moves one step, ⌥-arrow moves further and ⌘-arrow moves as far as it can. Add in Shift (⇧) to select as you go. If you type the same phrases frequently, you can go even further by using text expansion tools to turn short abbreviations into full blocks of text.
Mac Keyboard Shortcuts Cheat Sheet: Quick Reference Guide
Now that you know how to use keyboard shortcuts on Mac, here are a few takeaways to keep in mind:
- App keyboard shortcuts are listed in the menus.
- Use the menus to learn shortcuts for items you use a lot.
- Practice – your fingers will remember what to do if you do it often enough.
And I know I said that cheat sheets weren’t the best way to learn, but some of the Mac keyboard shortcuts I mentioned are not easy to discover, so here’s a quick reference:
Mac Keyboard Modifier Symbols
- ⌘: Command
- ⇧: Shift
- ⌥: Option
- ⌃: Control
Basic Mac Window Management Shortcuts
- ⌘C: Copy
- ⌘V: Paste
- ⌘Z: Undo
- ⌘S: Save
- ⌘W: Close the current window
- ⌘Q: Quit
App Switching and Window Management Shortcuts
- ⌘Tab: Switch between open apps
- ⌘`: Switch between windows of the same app
- ⌘H: Hide the current app
- ⌘M: Minimize the current window
- ⌃⌘F: Toggle full screen
Mac Screenshot Shortcuts
- ⇧⌘3: Grab the entire screen
- ⇧⌘4: Capture a selected area, press Space to grab a window.
- ⇧⌘5: Show the toolbar
- Add Control (⌃) to copy the screenshot to the clipboard instead of creating a file.
Mac Text Navigation Shortcuts
- Arrow: Move by character or line.
- ⌥ + Arrow: Move by word or paragraph
- ⌘ + Arrow: Move to the end of the line or document
- Add Shift (⇧) to select as you move the cursor.
Happy keyboarding! Once you have these Mac keyboard shortcuts down, you might be curious about where all that saved time actually goes. A time tracking app can show you exactly how your workday breaks down — and help you spot even more opportunities to work smarter.
Beyond Shortcuts: AI-Assisted Typing with Cotypist
While mastering keyboard shortcuts significantly boosts productivity, emerging technologies are pushing efficiency even further. One such innovation is Cotypist, an AI-powered autocomplete tool for Mac that works across all applications.
Cotypist functions similarly to coding assistants like GitHub Copilot, but for general text input. It offers word and sentence completions as you type, potentially allowing you to express ideas more quickly. By reducing manual typing, it aims to save time and minimize errors.
For those who appreciate the efficiency of keyboard shortcuts, Cotypist represents an interesting evolution. It builds on the concept of minimizing hand movement and maximizing output. Just as shortcuts let you perform actions without reaching for the mouse, Cotypist attempts to let you write full sentences with fewer keystrokes.
Some notable features of Cotypist include:
- Compatibility with all Mac apps, complementing existing shortcuts
- Local processing on your Mac for privacy
- Adaptability to individual writing styles
- Potential benefits for non-native English speakers and those with dyslexia
Cotypist offers a free plan (up to 100 words a day), with paid Plus and Pro plans from $6/month (billed annually) and a 30-day Pro free trial on every install.
The combination of keyboard shortcuts and AI-assisted typing could create a highly efficient workflow. For example, you might use shortcuts to navigate between apps, then use Cotypist to draft responses quickly.
If you’re passionate about optimizing your Mac workflow, exploring tools like Cotypist alongside traditional keyboard shortcuts could provide insights into the future of efficient computing. You can also discover additional tools to supercharge your Mac for productivity in our guide to the best Mac apps.
Frequently Asked Questions: Mac Keyboard Shortcuts
How do I use keyboard shortcuts on a Mac?
To use a keyboard shortcut on a Mac, hold down one or more modifier keys — Command (⌘), Option (⌥), Control (⌃), or Shift (⇧) — and press a letter, number, or function key at the same time. For example, holding Command and pressing C copies selected text (⌘C), while Command-V pastes it. You can find shortcuts for almost any command by opening an app’s menu bar — the key combination is displayed to the right of each menu item. Start by learning five or six shortcuts you use most often, then gradually add more as they become muscle memory.
Do keyboard shortcuts work the same on a MacBook as on a desktop Mac?
Yes. Keyboard shortcuts on a MacBook work exactly the same as on an iMac, Mac Mini, Mac Studio, or Mac Pro. The modifier keys — Command (⌘), Option (⌥), Control (⌃), and Shift (⇧) — are in the same positions on all Apple keyboards. The only difference is that MacBook keyboards have a built-in Touch ID button (and older models had a Touch Bar), but all standard shortcuts remain identical. If you use an external keyboard, make sure the modifier key layout matches or remap the keys in System Settings > Keyboard.
What are the standard Mac keyboard shortcuts?
Standard Mac keyboard shortcuts are a set of commonly used shortcuts included in almost every Mac app. These shortcuts utilize modifier keys such as Command, Option, Control, and Shift to perform actions like Copy (⌘C), Paste (⌘V), Undo (⌘Z), Save (⌘S), Close the current window (⌘W), and Quit (⌘Q). Learning these shortcuts can significantly improve productivity as they only need to be learned once and can be applied across all apps.
How can I remember Mac keyboard shortcuts?
To remember Mac keyboard shortcuts, you can use a single modifier key, which is the Command (⌘) key. While holding it down, you can press a letter to execute the command. Some of these commands make sense, such as using “C” for copy, “S” for save, and “Q” for quit. Others you will just have to learn. It may be helpful to note that the paste key (“V”) is located right beside the copy key (“C”). If you’re new to using keyboard shortcuts, start by learning these five basic ones. With practice, you will soon see an increase in your productivity.
How can I discover and remember custom keyboard shortcuts in Mac apps?
To discover custom keyboard shortcuts in Mac apps, you can look at the app’s menus which show the commands and their associated keys and modifiers. You can decipher the Mac keyboard shortcuts symbols shown beside the menu commands, which can be found on recent Mac keyboards. If you are using a different keyboard, you need to be able to read these symbols. You can also click on the app’s “Help” menu and enter the command’s name in the text field to find the keyboard shortcut associated with it.
How can I add my own keyboard shortcuts to my Mac?
You can add your own keyboard shortcuts to your Mac using the System Settings. First, open System Settings and select Keyboard. Click the Keyboard Shortcuts button and select App Shortcuts in the sidebar. Use the + button to open a new dialog and select the desired application. Type in the menu title and create a custom shortcut by clicking on the almost invisible edit field on the Keyboard Shortcut line and pressing the keys. Click Done and check out the Tools menu to see your new shortcut.
What are the Mac keyboard shortcuts for taking screenshots?
The basic shortcut for taking a screenshot of the entire screen on a Mac is ⇧⌘3, and to copy the image instead of saving it as a file, you can add the Control key. To capture a specific part of the screen, you can use ⇧⌘4 and drag the crosshair over the desired area. While using this shortcut, you can also use Space to move the origin corner, click on a window to capture just that window, and use Option (⌥) to remove the drop shadow. Additionally, you can use ⇧⌘5 to show the screenshot toolbar, which offers various options such as a timer, screen recording, and capturing different types of screenshots.
Where can I find the Alt key on my Mac?
On Mac, the Alt key is called the Option key (⌥) and is located on either side of the Command key, between Command and Control on most Mac keyboards. If you’re coming from Windows, you might be looking for “Alt” – that’s Option on Mac! The Option key uses the ⌥ symbol, which some say resembles a railway switch, representing an alternative path or option you can take. You’ll use this modifier key for variations of standard shortcuts, like ⌥⌘S for custom shortcuts, or ⌥-arrow to move by word when editing text. Many Mac keyboards actually show both “option” and “alt” printed on the same key to help users transitioning from other systems.