10 Steps for Optimizing Your Time Tracking with Timing

If you’re a freelancer, you probably already know that time tracking is, well, worth your time.
On a micro-scale, time tracking gives you valuable insight into how long you spend on specific projects and activities; your most productive hours of the day; and what, if anything, may be distracting you from your priorities.
On a macro-scale, time tracking can help you develop greater time management skills, become more productive, and earn more cash (who doesn’t want that?).
That being said, there’s a right (and wrong) way to track your time. Tracking your time incorrectly, which often results from manual tracking or start-and-stop timers, can do you more harm than good by giving you an inaccurate picture of how you spend your precious minutes and hours.
But by following strategic steps in your time tracking, you can get the most out of this wise and productive habit – helping you to gain more detailed, in-depth knowledge of your own work habits, speed, and level of efficiency.
The Basics
The basics will get you a good start on time tracking.
#1: Use automatic time tracking.
Automatic time tracking ensures that you get an accurate, thorough overview of your time usage. It doesn’t rely on you – a distracted human-being – to keep track of how long you spend on every project and task.
And it doesn’t let you “fly under the radar” when you spend 45 minutes on social media.
Timing automatically tracks every minute you spend on your laptop or desktop computer, so that you get an accurate overview at the end of every day.
#2: Look at the “big picture.”
At the end of every working day, you’ll want to look at the “bigger picture” of how you spent your time.
Here’s what an end-of-day overview on Timing looks like:
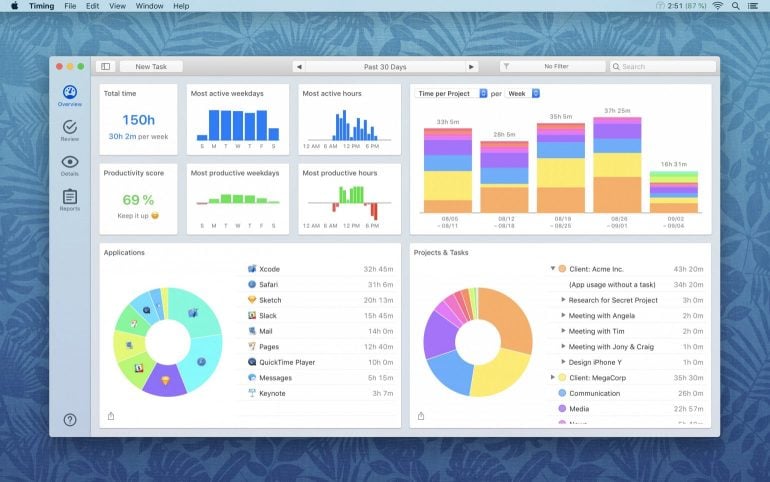
As you can see, Timing gives you a daily report of your working minutes and hours, broken down by application, category, or project. You’ll be able to view not only how much time you spent on a given task, but when you did it.
“Overview” will also show your most productive working hours of the day, giving you a better idea of when you’re most focused, and in turn how to strategically schedule your time accordingly.
Step #3: Pay attention to specific tasks, projects, and client work.
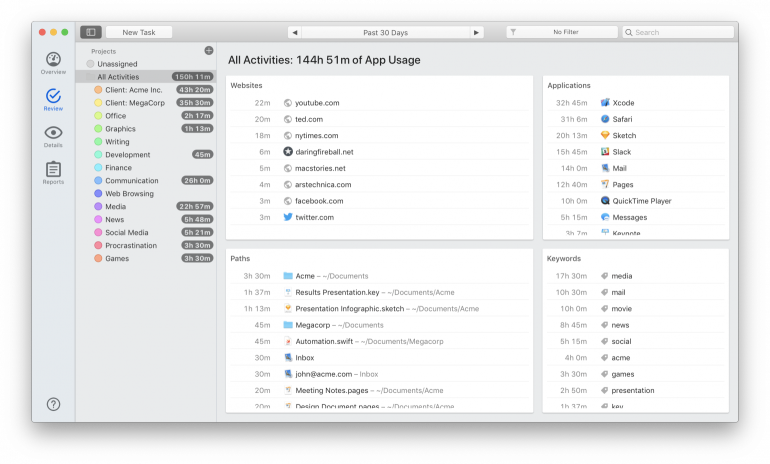
With Timing, you can go to the “Review” tab to see a more detailed breakdown of your time organized under paths – various places on your drive, or keywords – which are auto-generated to sort your work (for example by client name or topic).
Here’s what the “Review” tab looks like: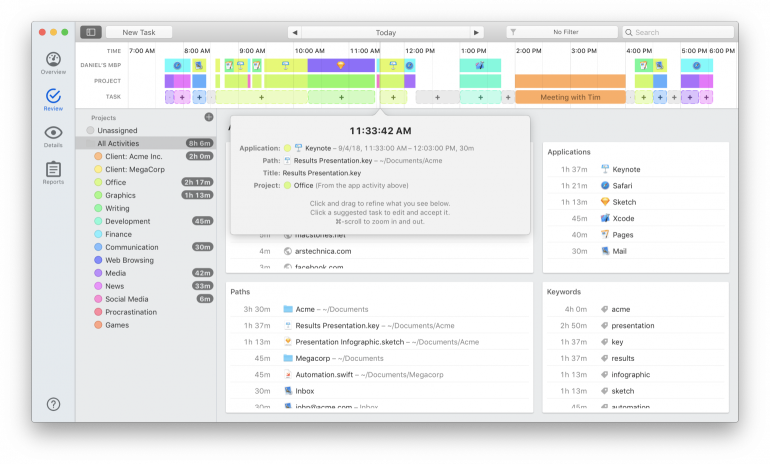
Under Review, you can use the “Drag and Drop” function to assign specific work to categories. For example, if you notice you spent 15 minutes on YouTube to prepare for a writing assignment, you can drag and drop the URL into your “Writing” category.
Across the top of “Review,” you’ll notice a timeline where you can see color-coded blocks that tell you when you have accomplished certain tasks, worked on specific applications, and more. You can also modify these blocks to categorize tasks.
Step #4: Report your time.
Reporting your time tracking results to clients can be an extremely efficient way to invoice your clients if you bill by the hour.
Timing will automatically generate reports for you, making this step easy and time-efficient.
Here’s what the “Reports” tab looks like in Timing:
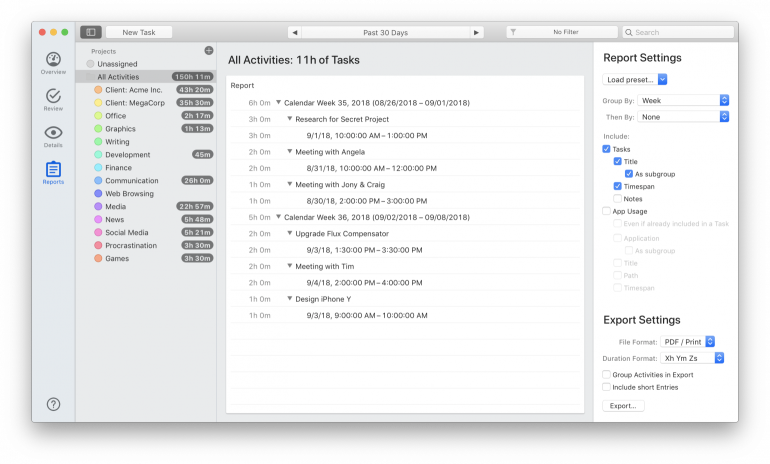
You can still customize your reports using “Report Settings” and even choose how you want it to be exported in “Export Settings.”
Next Steps
Take “Next Steps” to level up your time tracking by generating the most accurate results from Timing, and get a larger-scale idea of changes in your productivity over time.
Step #6: Form a habit of reviewing your time.
Understanding your overall time expenditure may be helpful, but knowing how much time you spend on various tasks, projects, and clients is immeasurably helpful.
For example, you might have a client that doesn’t pay very well, but is taking a large number of working hours every week. Knowing this can encourage you to either adjust your rates or to consider cutting down on this type of work.
Timing automatically categorizes your time by application, general category, keyword, and path, but you can also create projects manually to gain even more valuable reporting on various clients.
Under the “Review” tab, select “Create New Project,” and then select a color and productivity rating (in other words, rank how important this task is), and finally assign a keyword to the project.
You can even set up complex rules for your projects under the “Rule Editor,” helping Timing to give you ultra-specific results.
Trust us: Investing a few minutes of your time into developing complex rules will pay off later on, when you get automated results with precision and accuracy.
Step #7: “Drag and drop” to automatically assign your time to specific projects.
Rather than revisiting your time at the end of the day and re-organizing it, assign specific tasks or applications to projects or clients with the “Drag and Drop” function, as mentioned above.
For example, if you use Mail exclusively for your “Communications” category, you can drag and drop Mail into “Communications” under the “Review” tab. And if you keep the Option/Alt key pressed while dragging, Timing will automatically create a rule for you.
Now, any task you perform in Mail will automatically be assigned to “Communications.” You can perform the same function by creating categories for specific clients. For example, if you only use Excel for a specific client, Timing will automatically allot any time spent in Excel to that client category.
Step #8: Add time manually when necessary.
If you hold a meeting, have a conversation over the phone, or spend time brainstorming on paper, make sure to add those tasks to your overall time expenditure. You may even want to log in time for going to the gym, grocery shopping, or having drinks with friends.
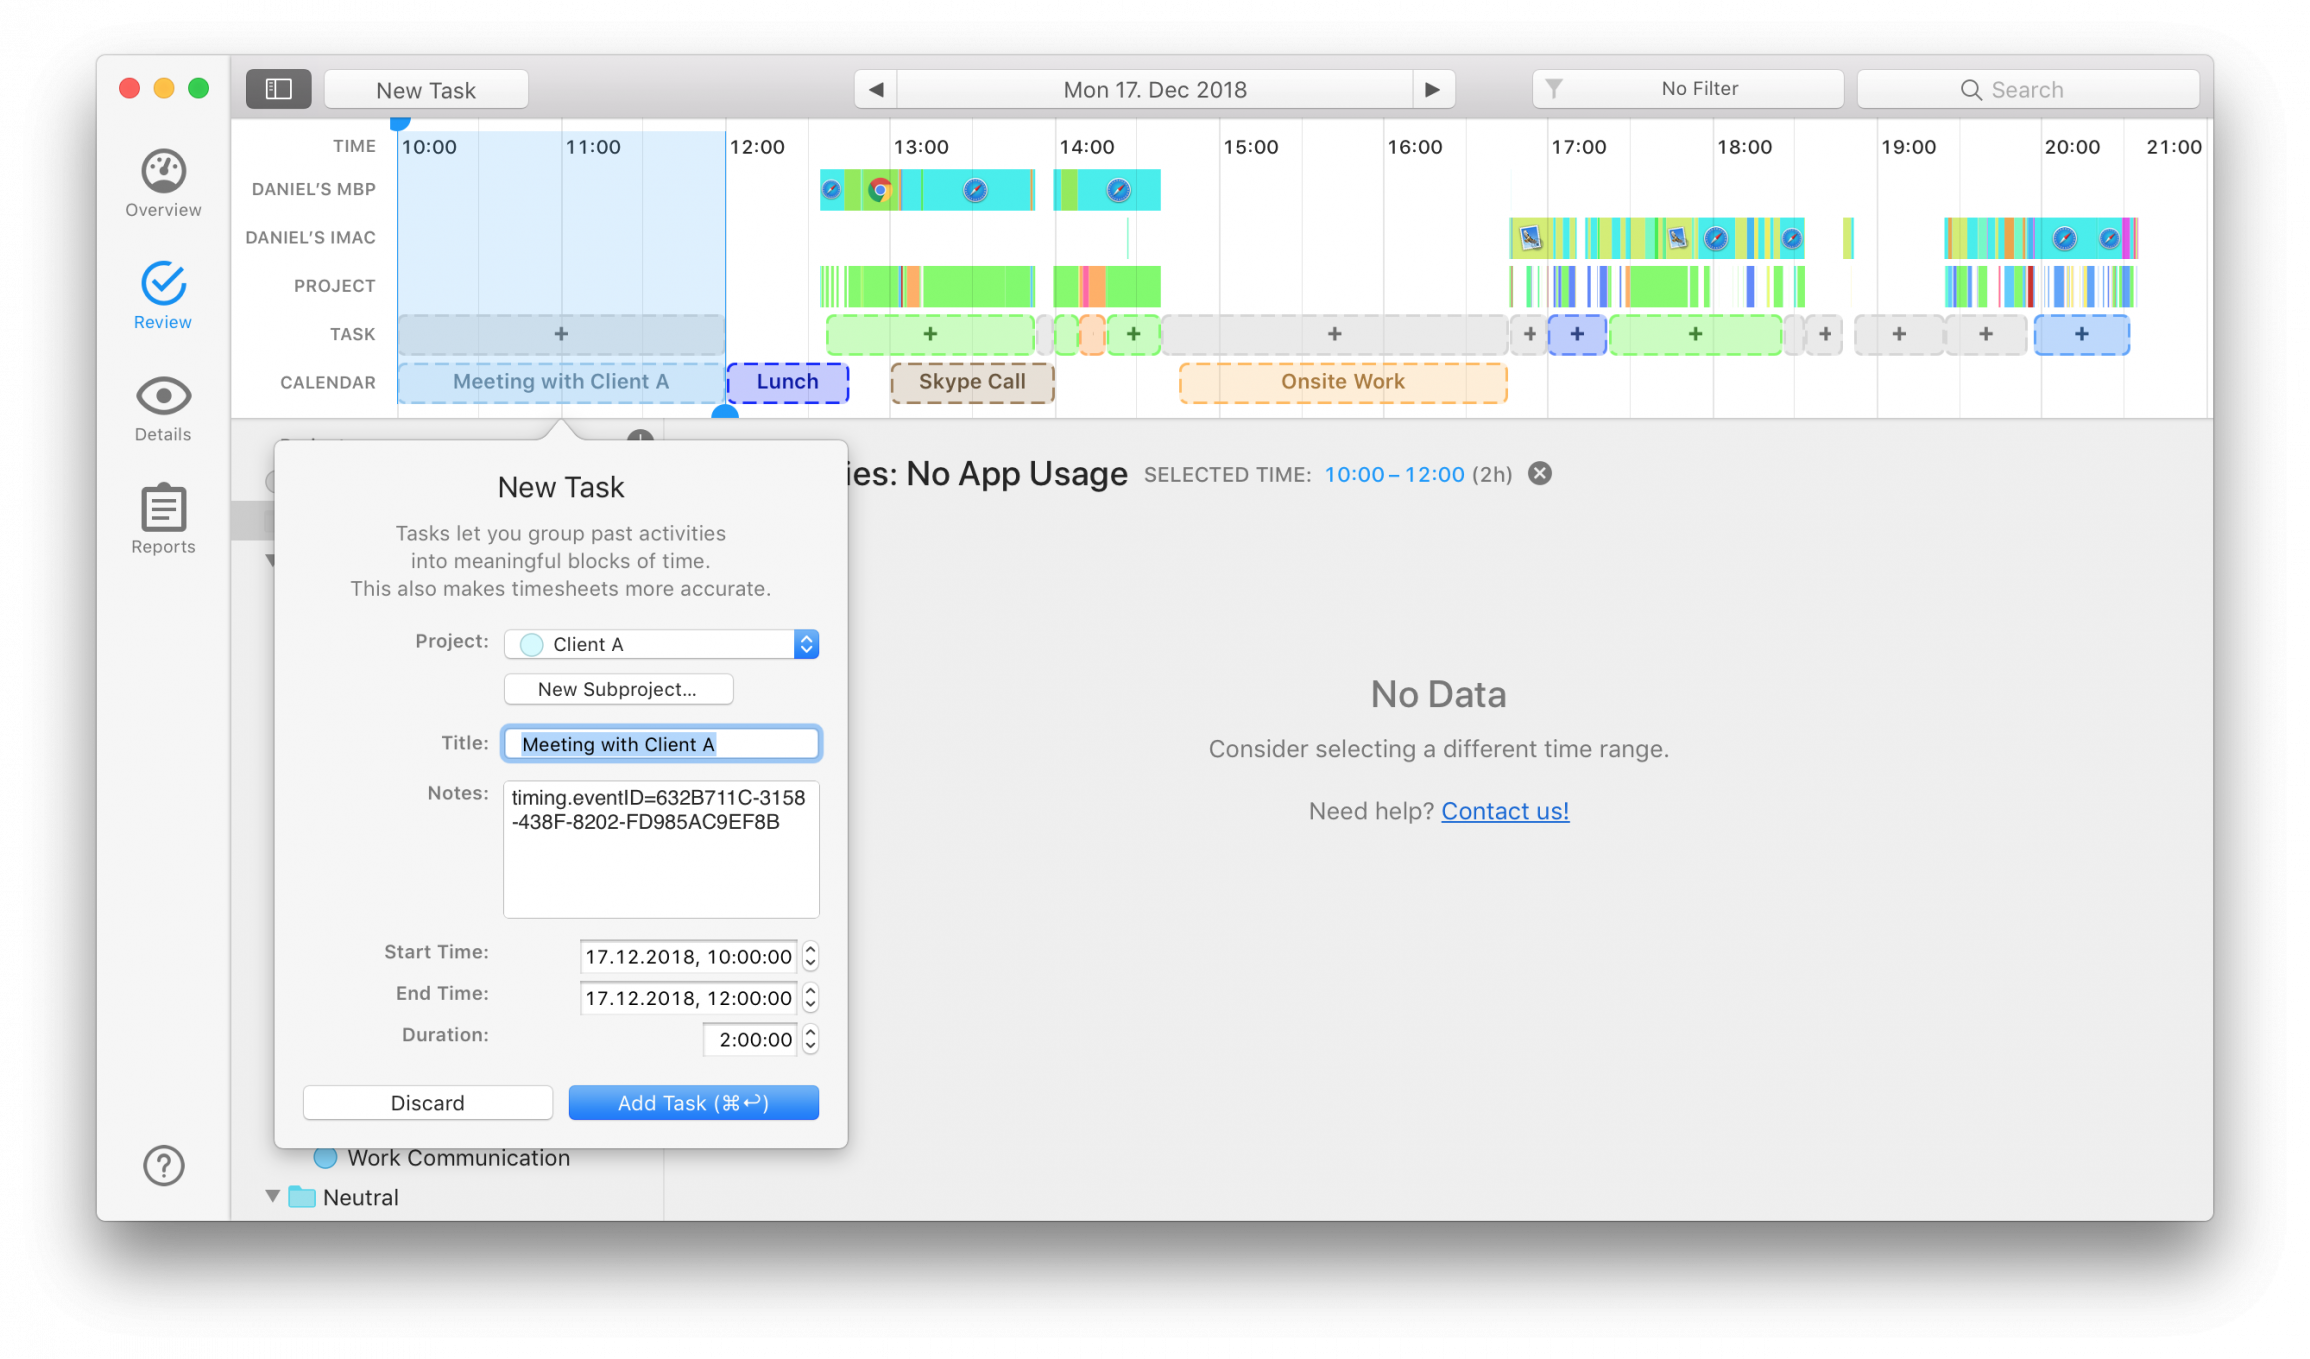
You can do this in Timing by pressing the “New Task” button in the upper left-hand corner.
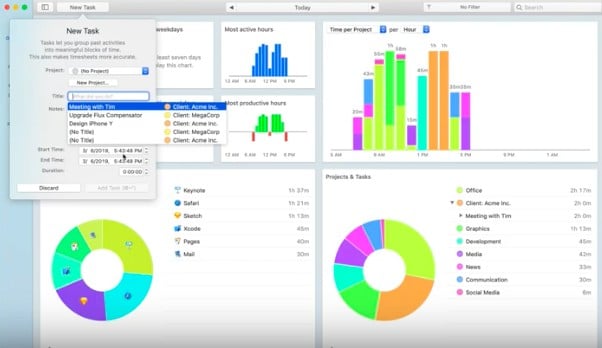
Alternatively, you can adjust the settings on your desktop so that Timing will automatically ask what you were doing after “idle time.” Then, you can enter your task manually.

Step #9: Consider your time usage over one week, one month, or one year.
Step #10: Use Timing to view your calendar events.
Timing will also automatically sync to your calendar events, so that your time management and administration are kept all in one place.
You can assign calendar events to specific projects under the “Review” tab, located on the timeline across the top of the screen.
Closing Thoughts
Optimizing your time tracking requires just a little planning and organizational effort on your part to produce stellar results. Timing does most of the hard work for you by automatically tracking time, organizing and tagging events, and even letting you know how productive you’ve been on any given day with a personal “Productivity Score.”
Intentional time tracking can help you significantly boost your productivity so that you become a more effective, successful freelancer.
If you don’t already use time tracking, give Timing a try by clicking here.